Adding & Verifying Domains
Learn how to add and verify your domain in WhautoMail to start sending emails.
Why Verify Your Domain?
Domain verification proves you own the domain and allows you to:
- Send emails from your domain
- Improve email deliverability
- Build sender reputation
- Comply with email authentication standards
Step 1: Configure Your Email Domain
Once you have configured your SMTP provider (Mailgun or AWS SES), you can add your domain.
You can access the domain configuration in two ways:
Option 1:
- Continue the Get Started section and choose Step 2 (Configure Sender)
Option 2:
- Go to the Settings menu
- Under the Email section, select Email Senders
- Click the + Add Domain button to continue
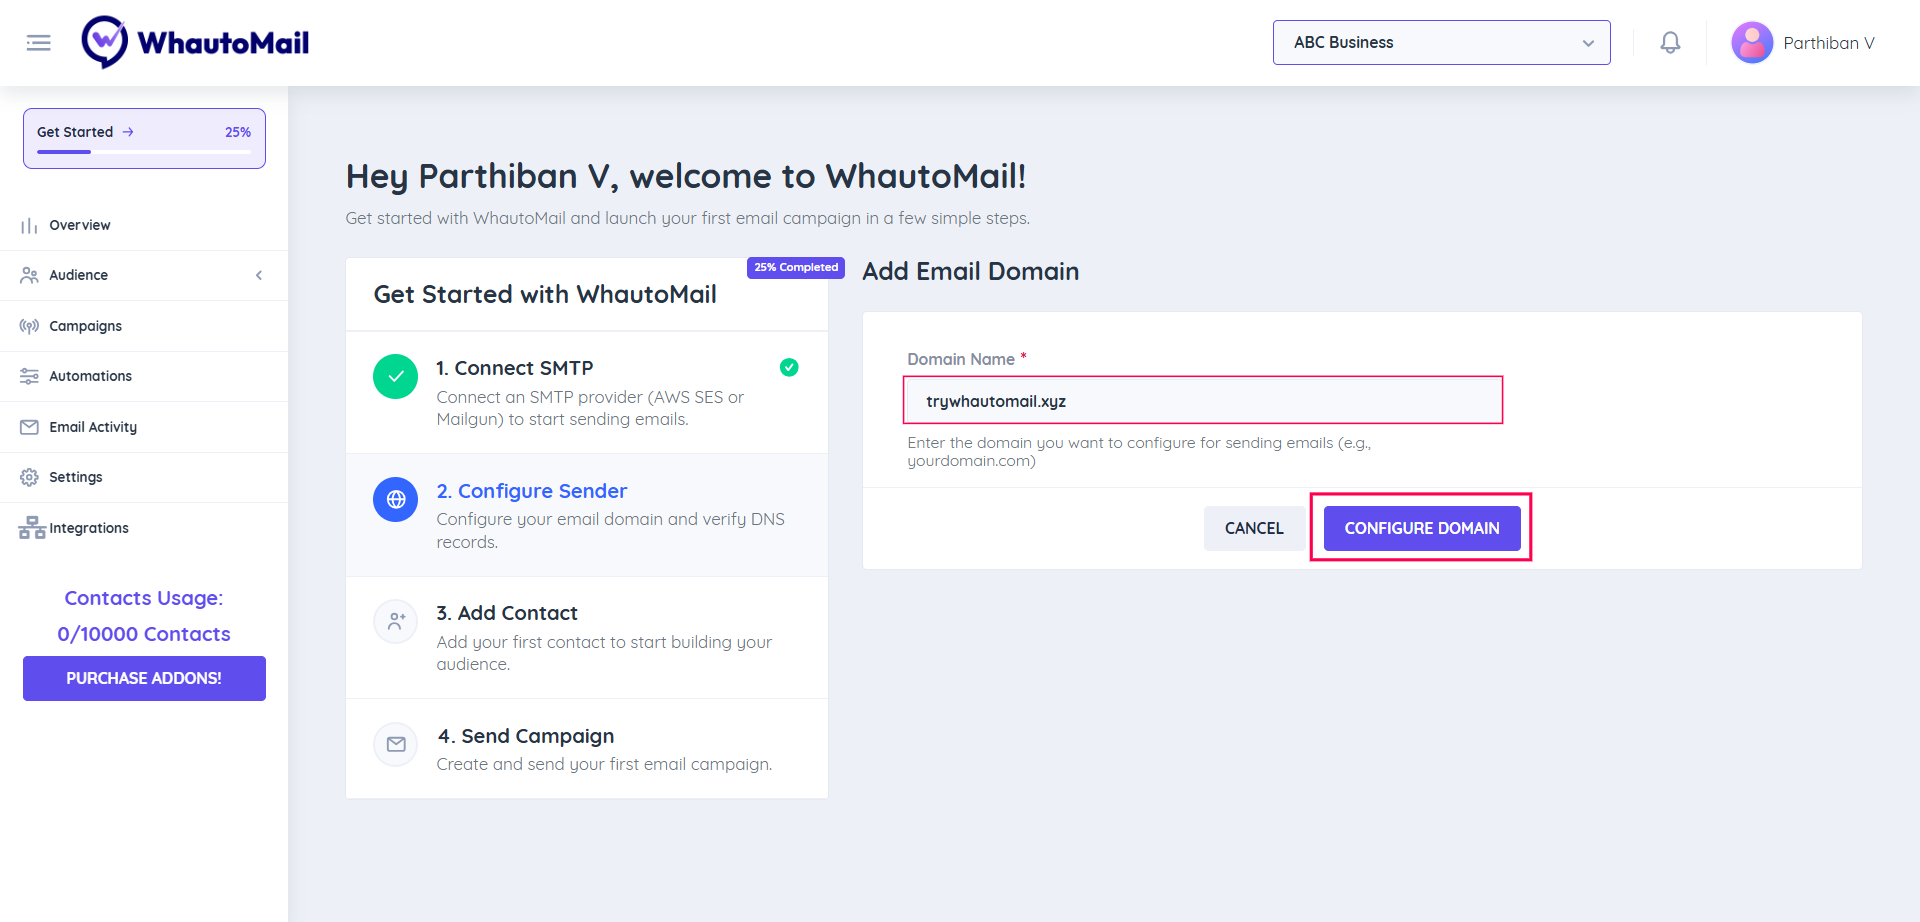
Step 2: Enter Your Domain
To send emails from your own domain (e.g., yourdomain.com), you'll need to verify your DNS records.
- Enter your domain name (for example,
yourdomain.com) - Click Configure Domain to continue
Step 3: DNS Configuration
Once you configure the domain, it will automatically redirect you to the DNS Configuration section.
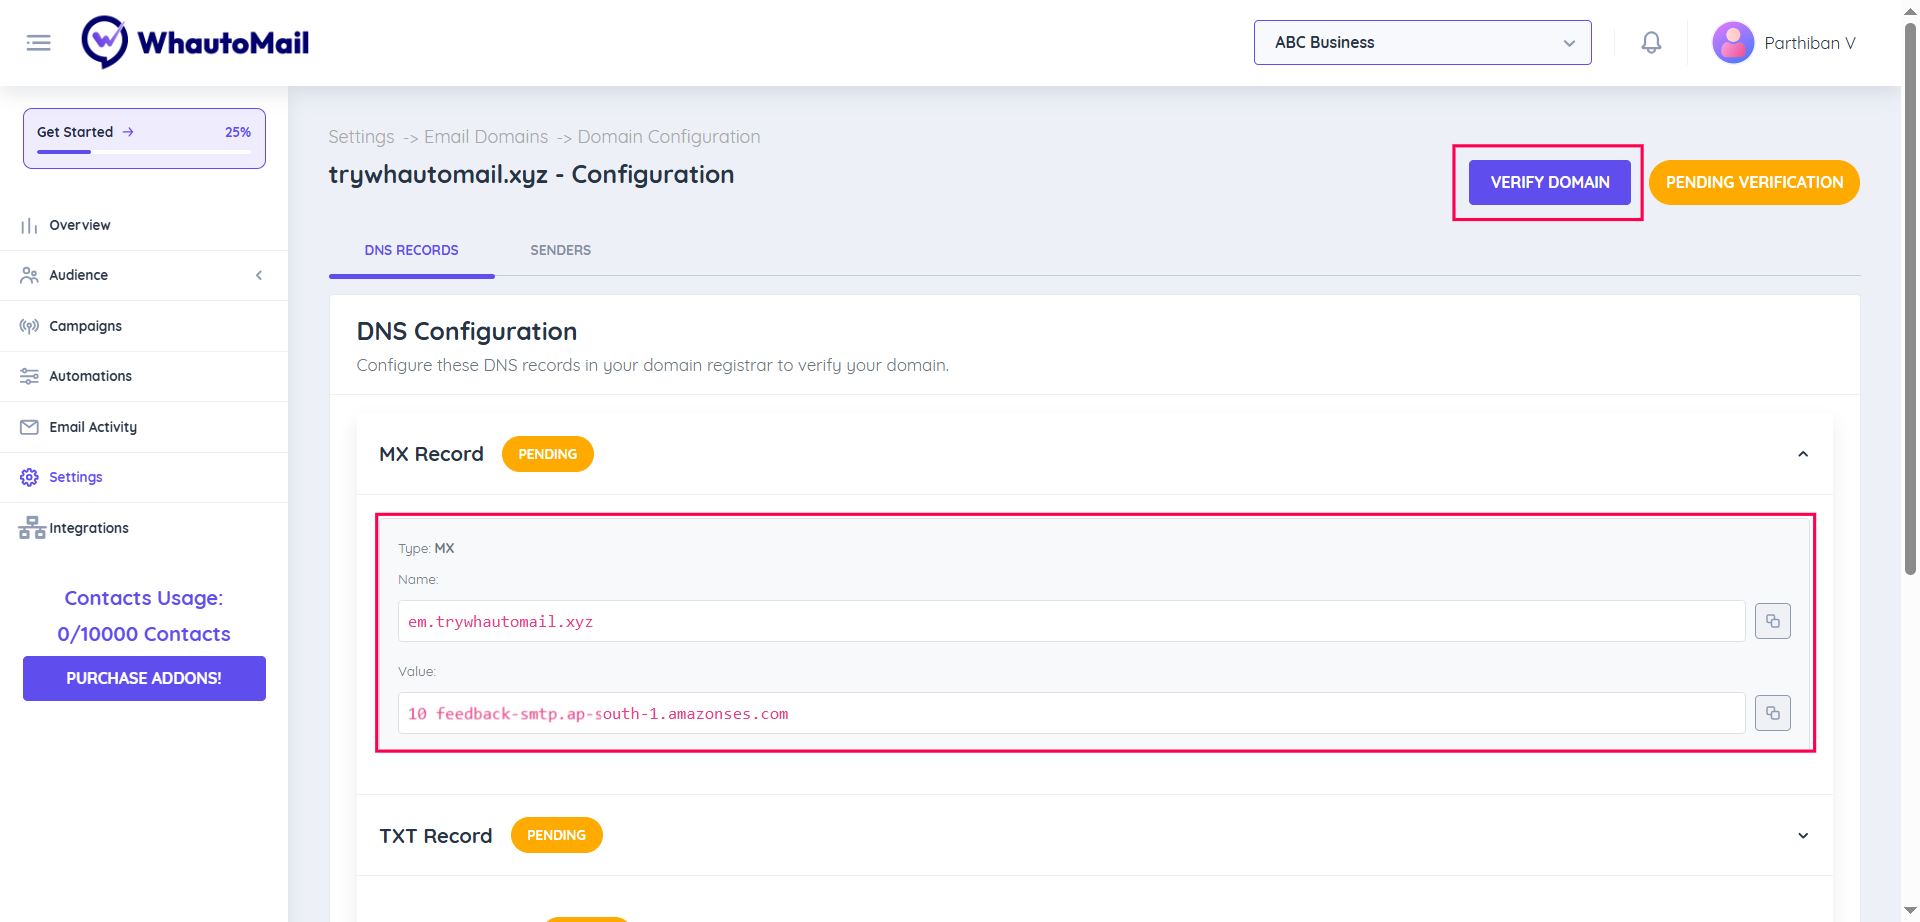
To verify your domain, you'll need to add DNS records provided by your email provider (Mailgun or AWS SES).
Add DNS Records
- Log in to your domain registrar (like GoDaddy, Namecheap, Cloudflare, etc.)
- Add the DNS records shown in WhautoMail (these confirm you own the domain)
- Once added, go back to WhautoMail and click Verify
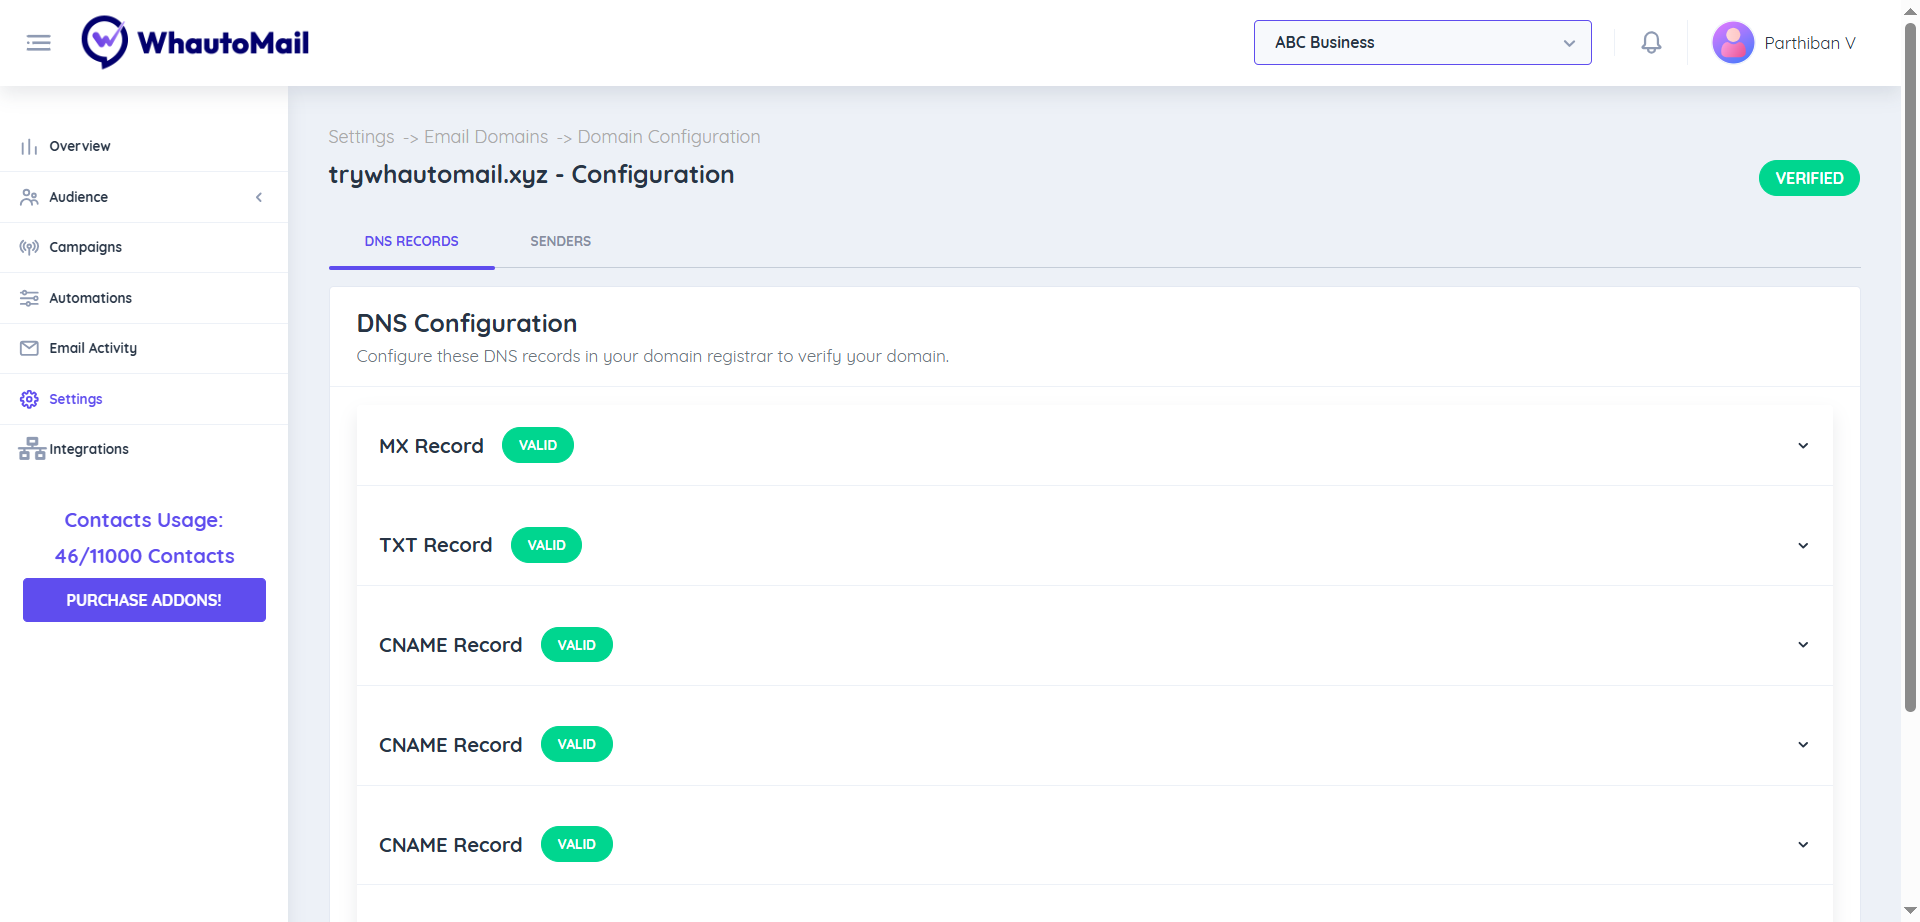
When all records are marked Valid, your domain is verified successfully 🎉
DNS Record Types
Depending on your email provider (AWS SES or Mailgun), you'll need to add various DNS records:
- TXT records: For domain verification
- SPF records: Sender Policy Framework
- DKIM records: DomainKeys Identified Mail
- DMARC records: Domain-based Message Authentication (optional but recommended)
WhautoMail will show you exactly which records to add based on your email provider.
Adding DNS Records by Provider
Using Popular DNS Providers
Cloudflare
- Log in to Cloudflare
- Select your domain
- Go to DNS → Records
- Click Add record
- Enter the record details
- Click Save
GoDaddy
- Log in to GoDaddy
- Go to My Products → DNS
- Click Add under DNS Records
- Select record type (TXT, CNAME, etc.)
- Enter the details
- Click Save
Namecheap
- Log in to Namecheap
- Go to Domain List → Manage
- Click Advanced DNS
- Click Add New Record
- Enter the record details
- Click Save
Google Domains
- Log in to Google Domains
- Select your domain
- Click DNS in the left menu
- Scroll to Custom records
- Click Create new record
- Enter the details
- Click Add
DNS Propagation
After adding DNS records, you'll need to wait for propagation before verification succeeds.
DNS propagation typically takes 15-30 minutes but can take up to 48 hours. Be patient!
Checking DNS Propagation
Use these tools to check if your DNS records are propagated:
Troubleshooting
Domain Not Verifying
Check DNS Records
- Ensure records are added correctly
- Verify no typos in record values
- Check record type is correct (TXT, CNAME, etc.)
Wait for Propagation
- DNS changes can take up to 48 hours
- Check propagation using DNS checker tools
Remove Extra Characters
- Some DNS providers add quotes automatically
- Remove duplicate quotes if present
Check TTL Settings
- Lower TTL values propagate faster
- Set TTL to 300-3600 seconds
Common Errors
"Record Not Found"
- DNS records haven't propagated yet
- Records were added to wrong domain/subdomain
- DNS provider hasn't updated records
"Invalid Record Value"
- Extra spaces or characters in value
- Quotes added incorrectly
- Value was truncated
"Multiple Records Found"
- Duplicate records exist
- Remove old/duplicate records
- Keep only the latest verification record
Verification Taking Too Long
If verification is taking more than 48 hours:
- Double-check all DNS records
- Use DNS checker tools to verify propagation
- Try removing and re-adding records
- Contact your DNS provider
- Contact WhautoMail support
Managing Multiple Domains
You can add multiple domains to your WhautoMail account:
- Each domain must be verified separately
- Choose a default domain for sending
- Assign domains to different sender profiles
- Monitor each domain's reputation independently
Domain Status Indicators
- Pending ⏳: Domain added, awaiting verification
- Verified ✓: Domain verified and ready to use
Best Practices
Verify Quickly
- Add DNS records immediately after adding domain
- Don't wait to verify
- Faster verification = faster sending
Monitor Status
- Check domain status regularly
- Re-verify if status changes
- Keep DNS records up to date
Keep Records Updated
- Don't delete verification records
- Update records if email provider changes
- Maintain all authentication records (SPF, DKIM, DMARC)
Next Steps
After verifying your domain:
Need Help?
If you're having trouble verifying your domain:
- Contact support at support@whautomail.com
- Include your domain name and DNS provider in your message