📨 Connect Your AWS SES Provider with WhautoMail
This guide will help you connect your AWS SES account with WhautoMail, so you can start sending professional emails using your verified domain.
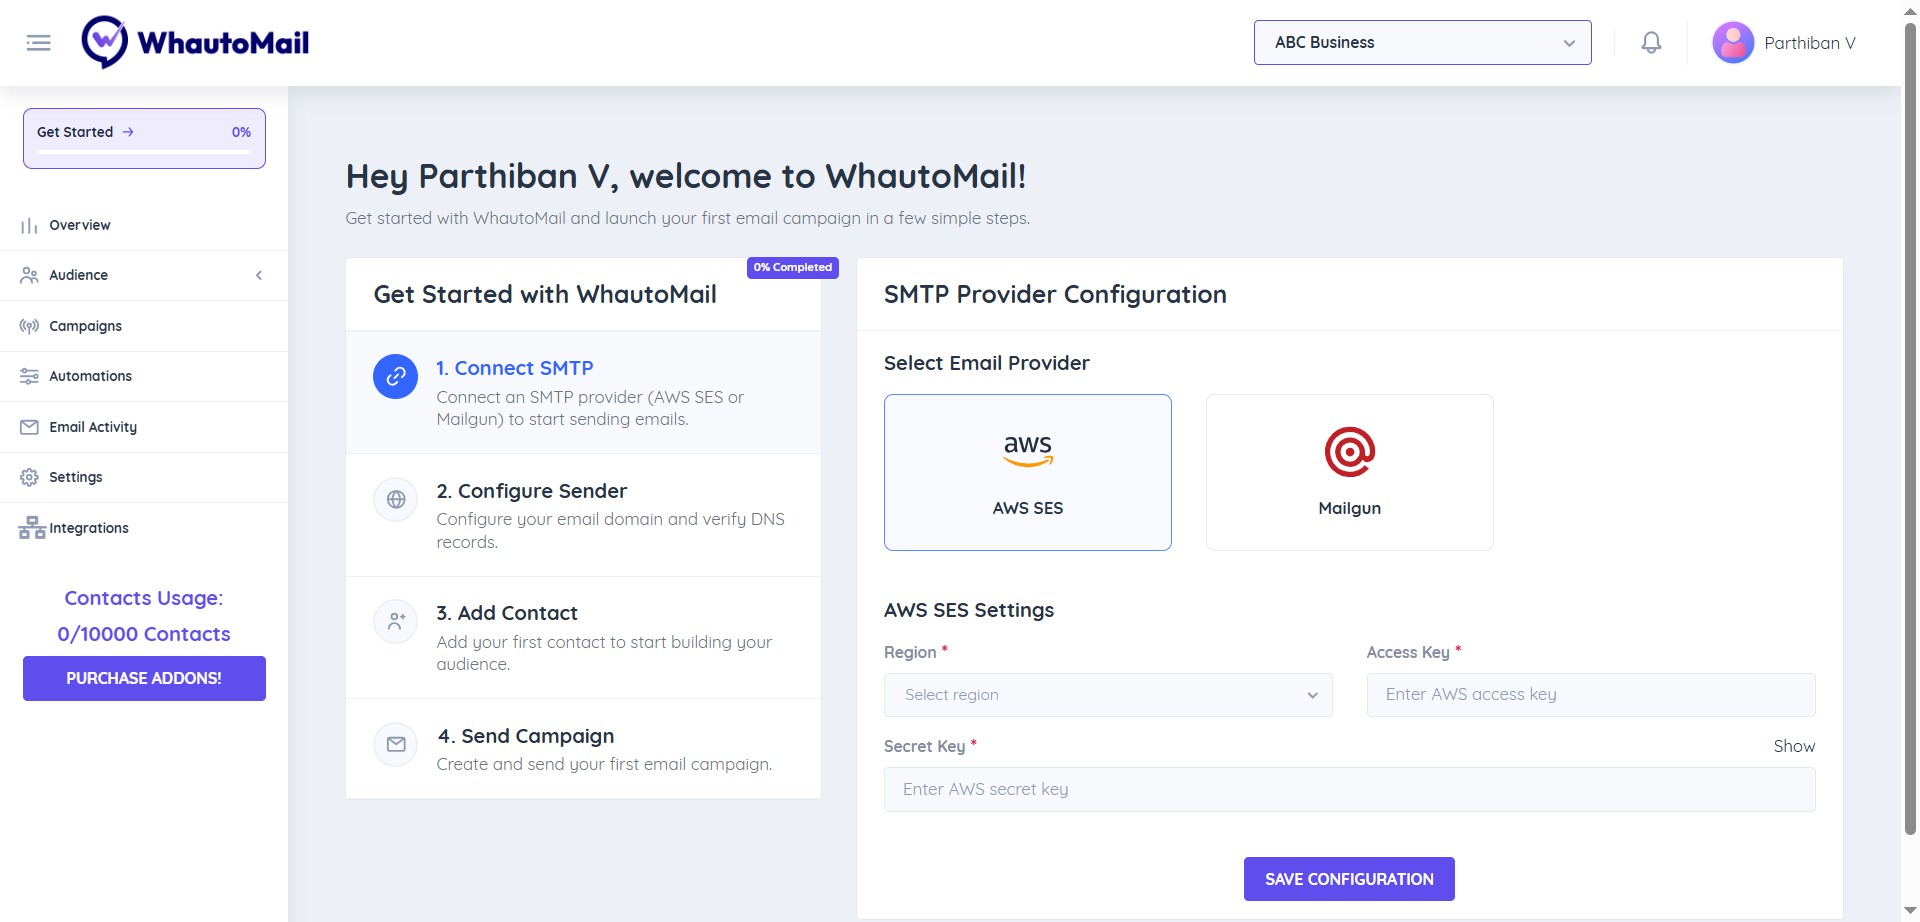
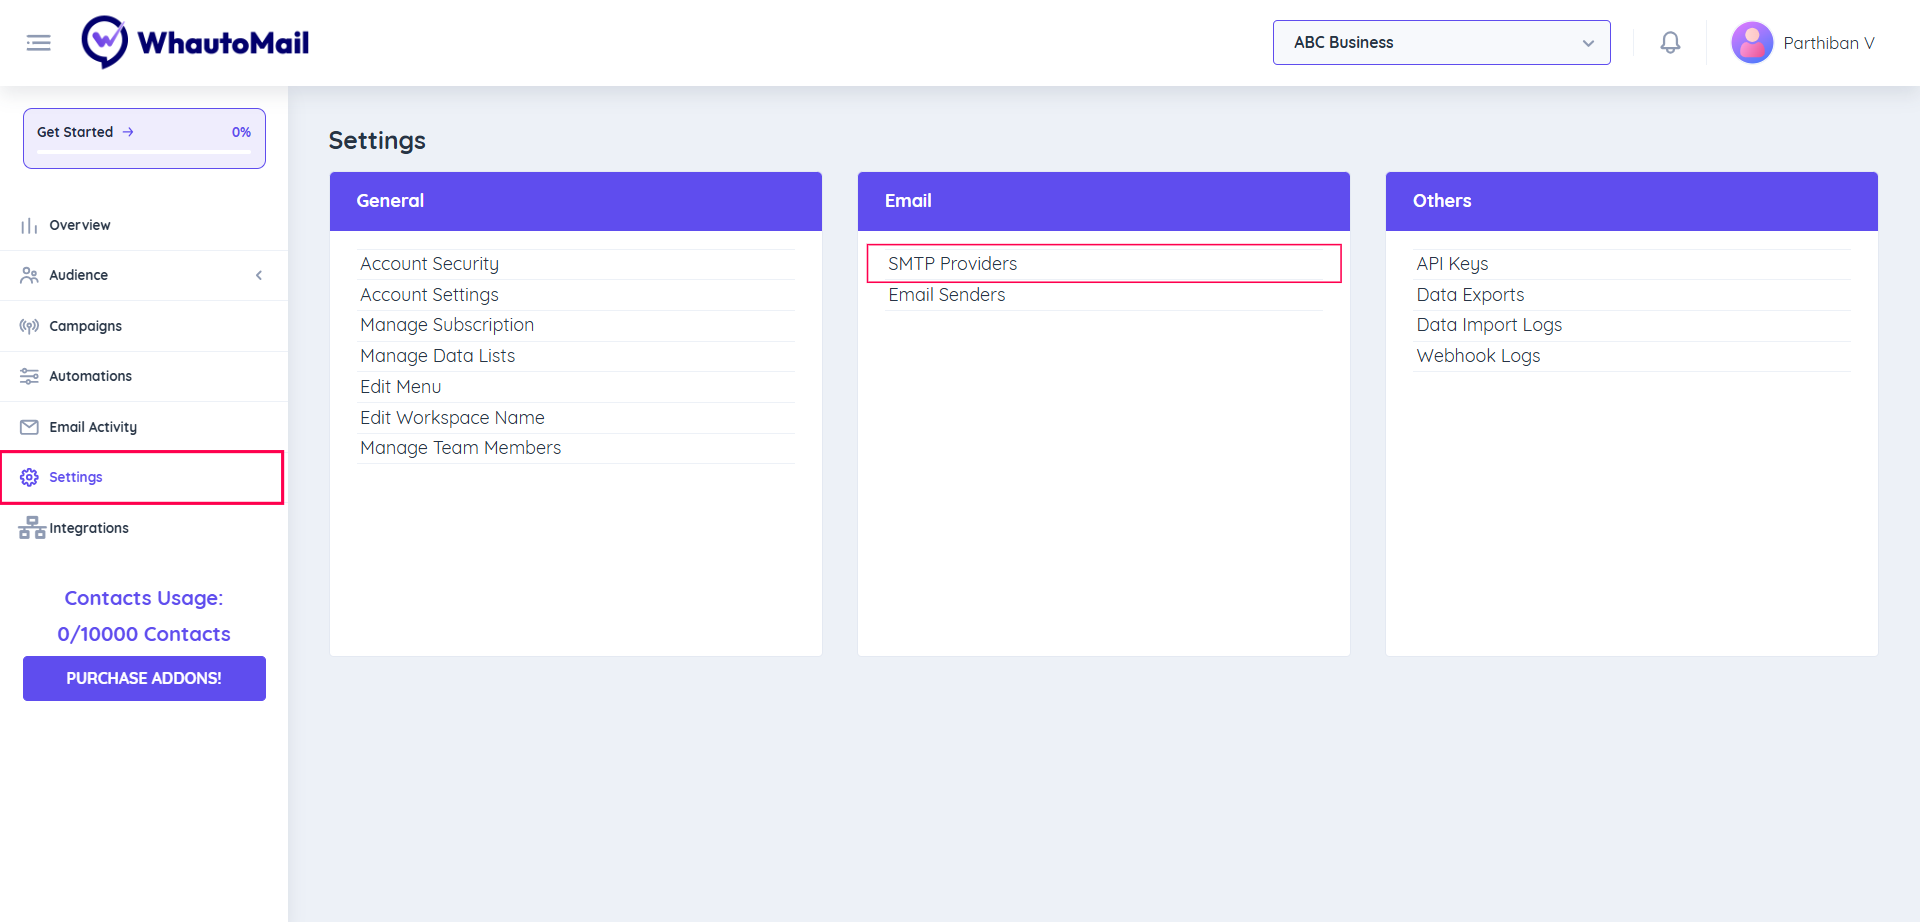
Step 1: Go to the WhautoMail App
You can access the SMTP setup in two ways:
Option 1:
- Open the WhautoMail app
- Go to the Get Started section and choose Step 1
Option 2:
- Go to the Settings menu
- Under the Email section, select SMTP Providers
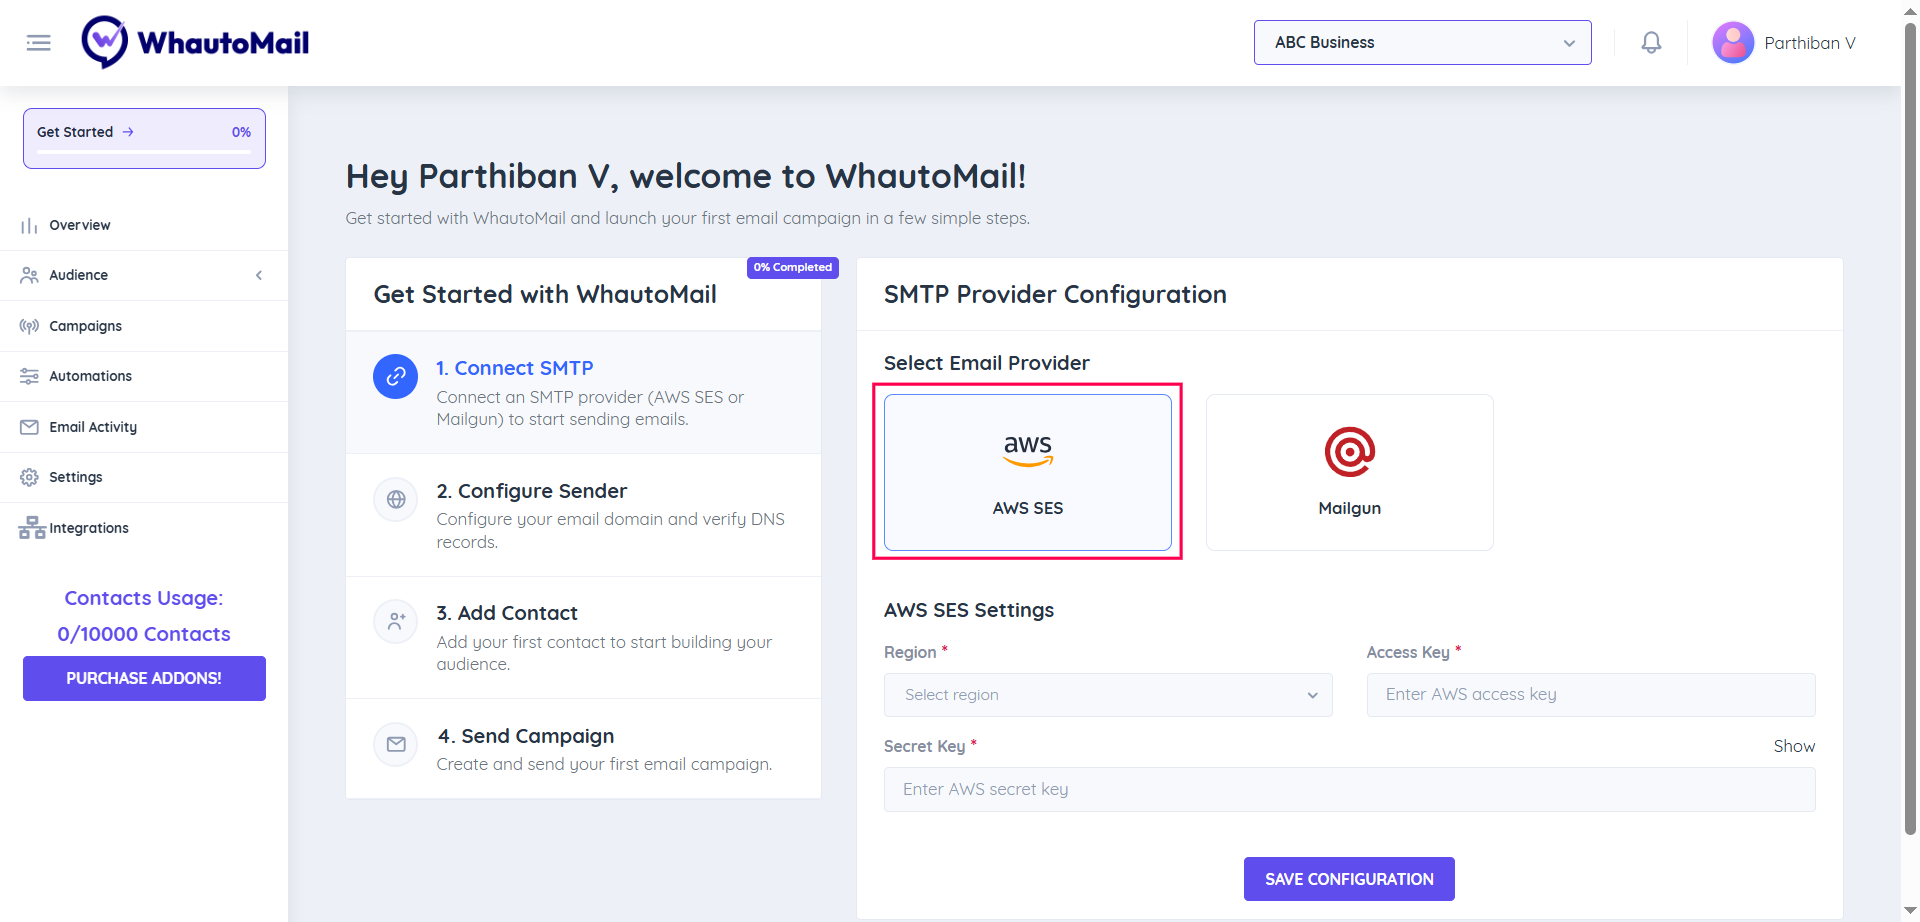
Step 2: Choose Your SMTP Provider
Select AWS SES as your SMTP provider from the available options.
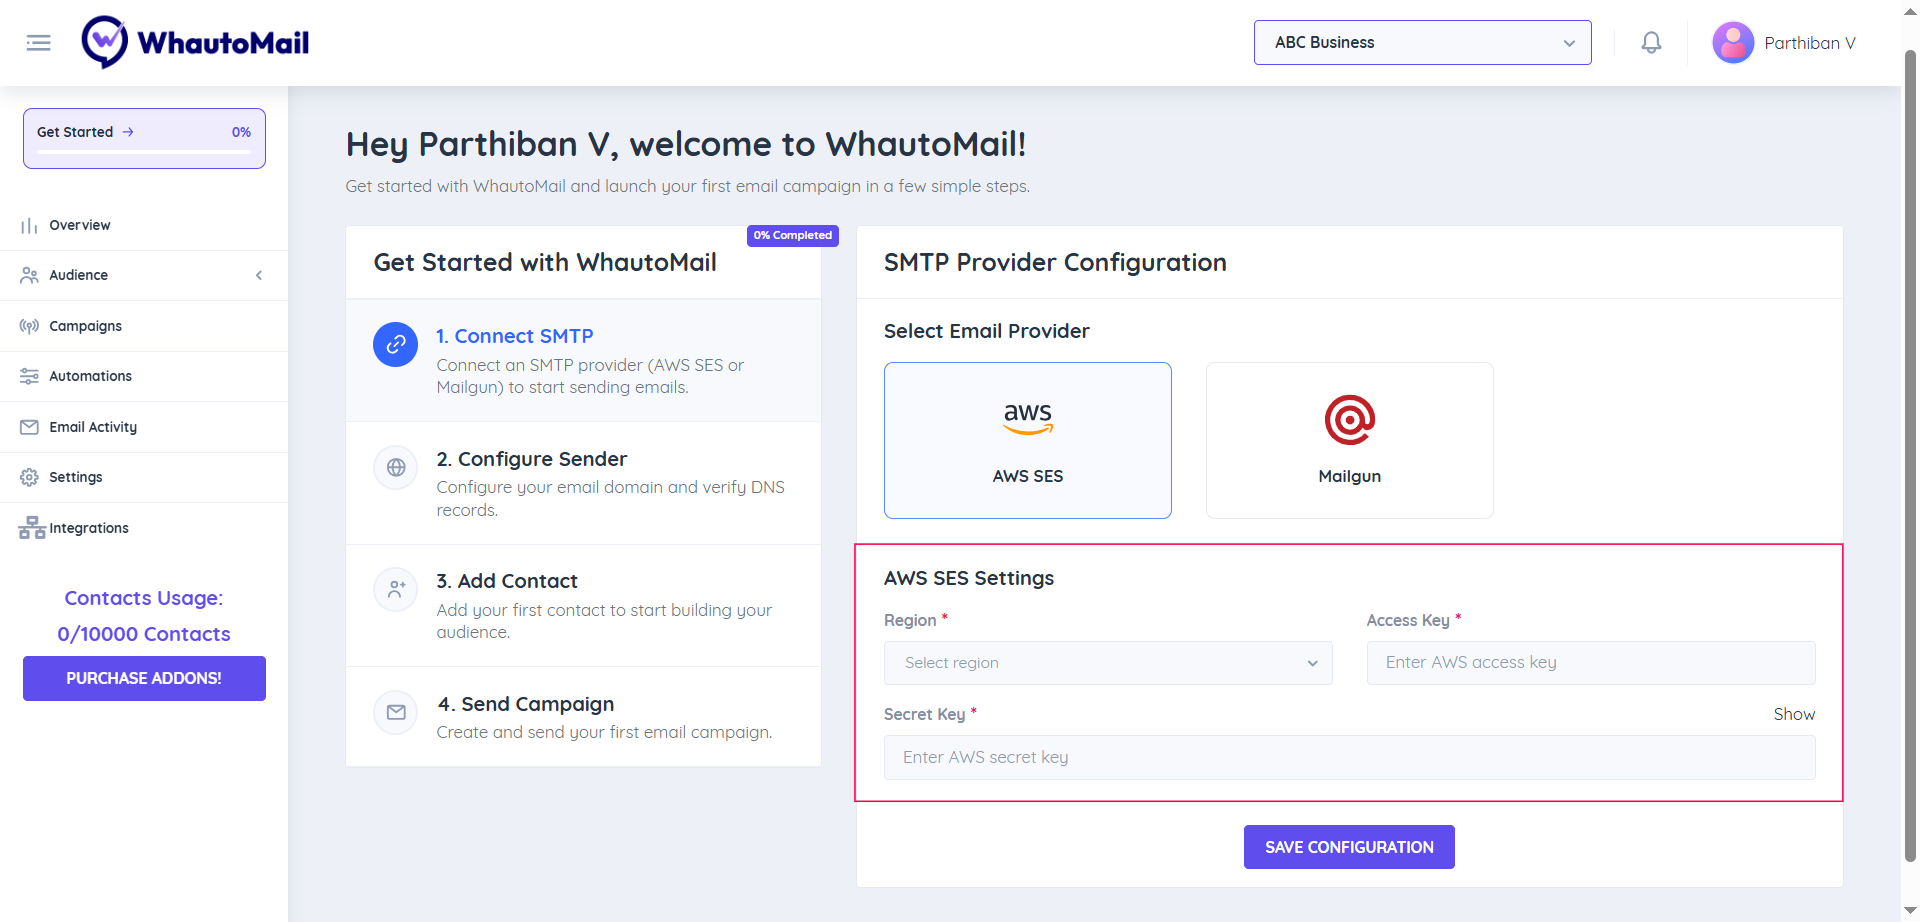
Step 3: Configure AWS SES Settings
You'll need to provide your AWS Region, Access Key, and Secret Key to connect your AWS SES account.
Required Information:
- Region: Select your region (e.g., Asia Pacific - Mumbai, US East - N. Virginia)
- AWS Access Key: Your IAM access key
- AWS Secret Key: Your IAM secret key
Follow the steps below to generate these keys in your AWS account.
🔑 Create Access Keys in AWS
1. Sign in to AWS Console
- Go to aws.amazon.com and sign in to your AWS account
- If you don't have an account, create a new one first
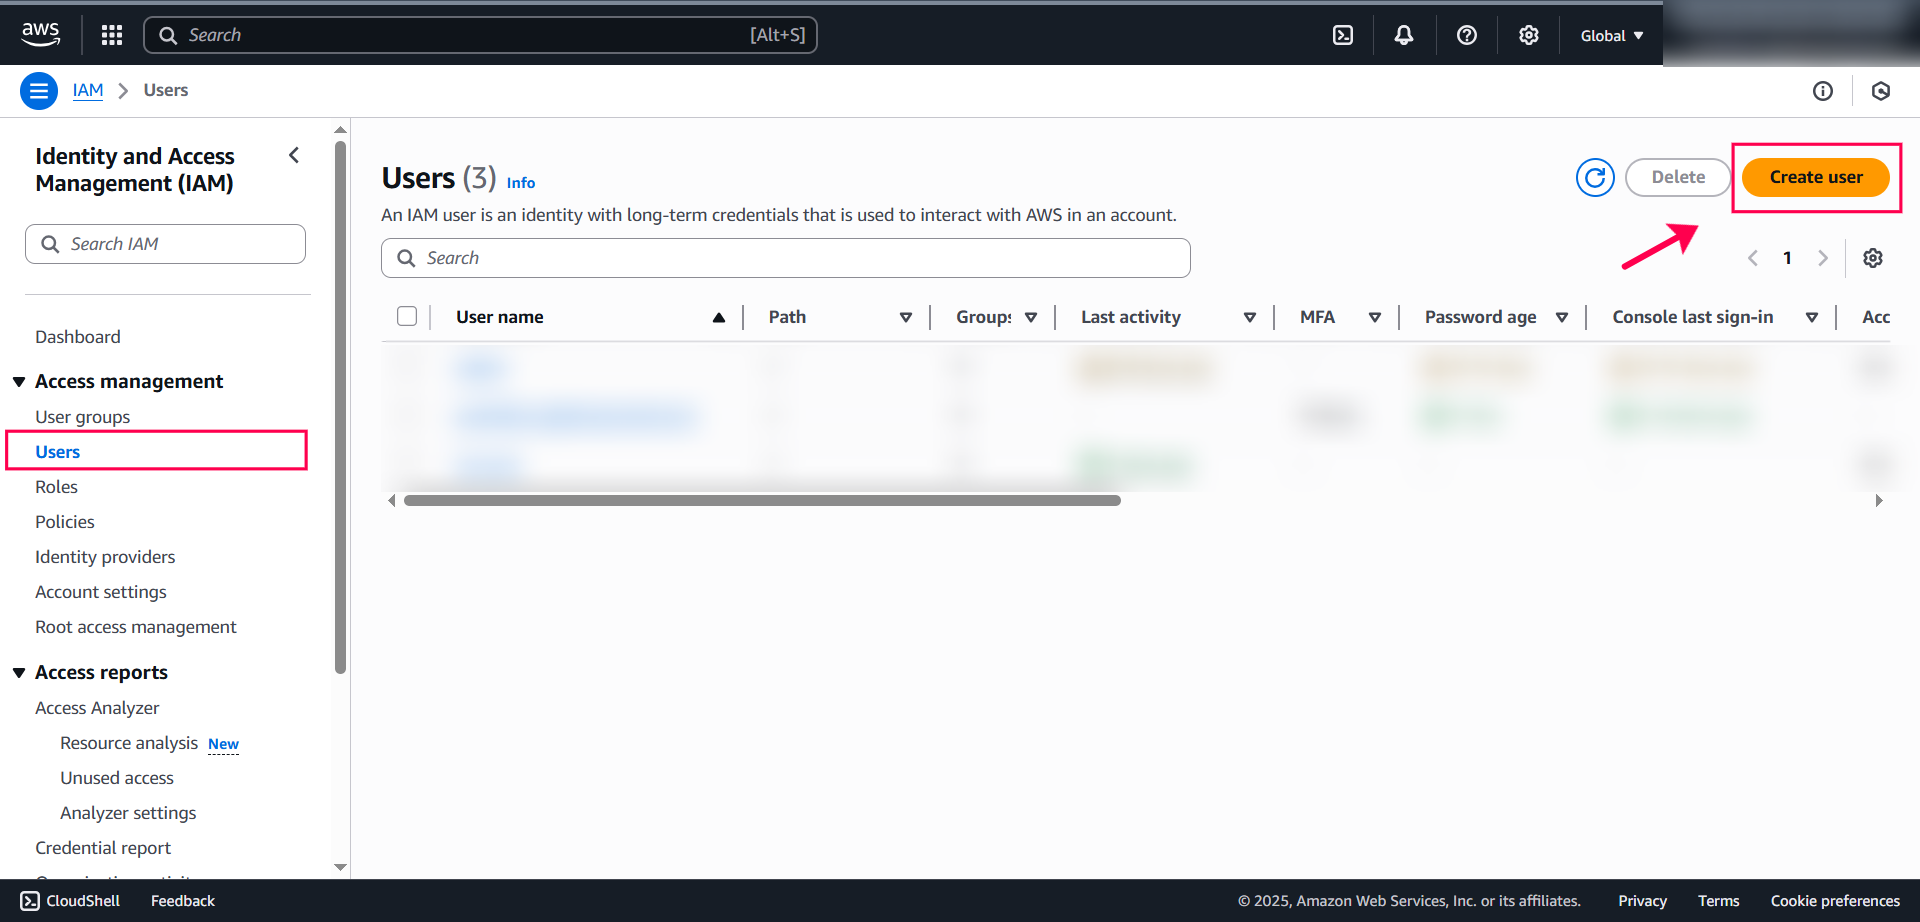
2. Open IAM Service
- In the top search bar, type IAM and open the IAM Service

- From the left menu, select Users
- Click Create user
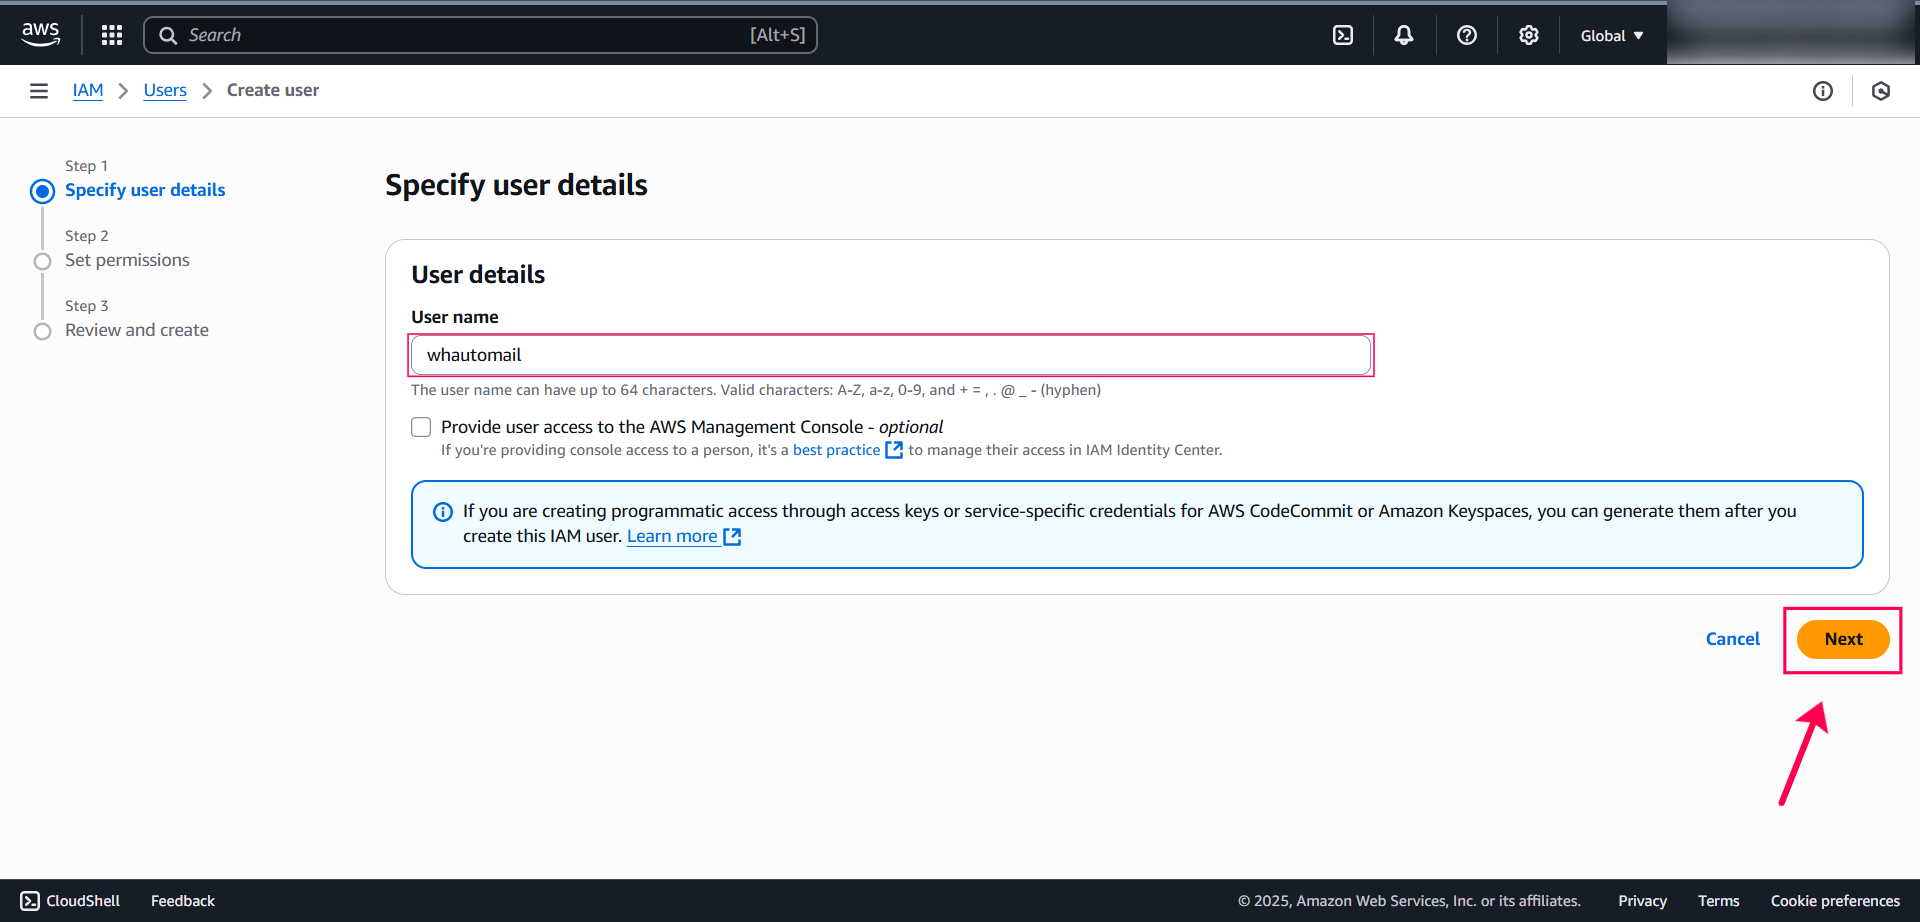
3. Create a New IAM User
- User name: Enter a descriptive name like
whautomail - Click Next
4. Set Permissions
- Choose the 3rd option: Attach policies directly
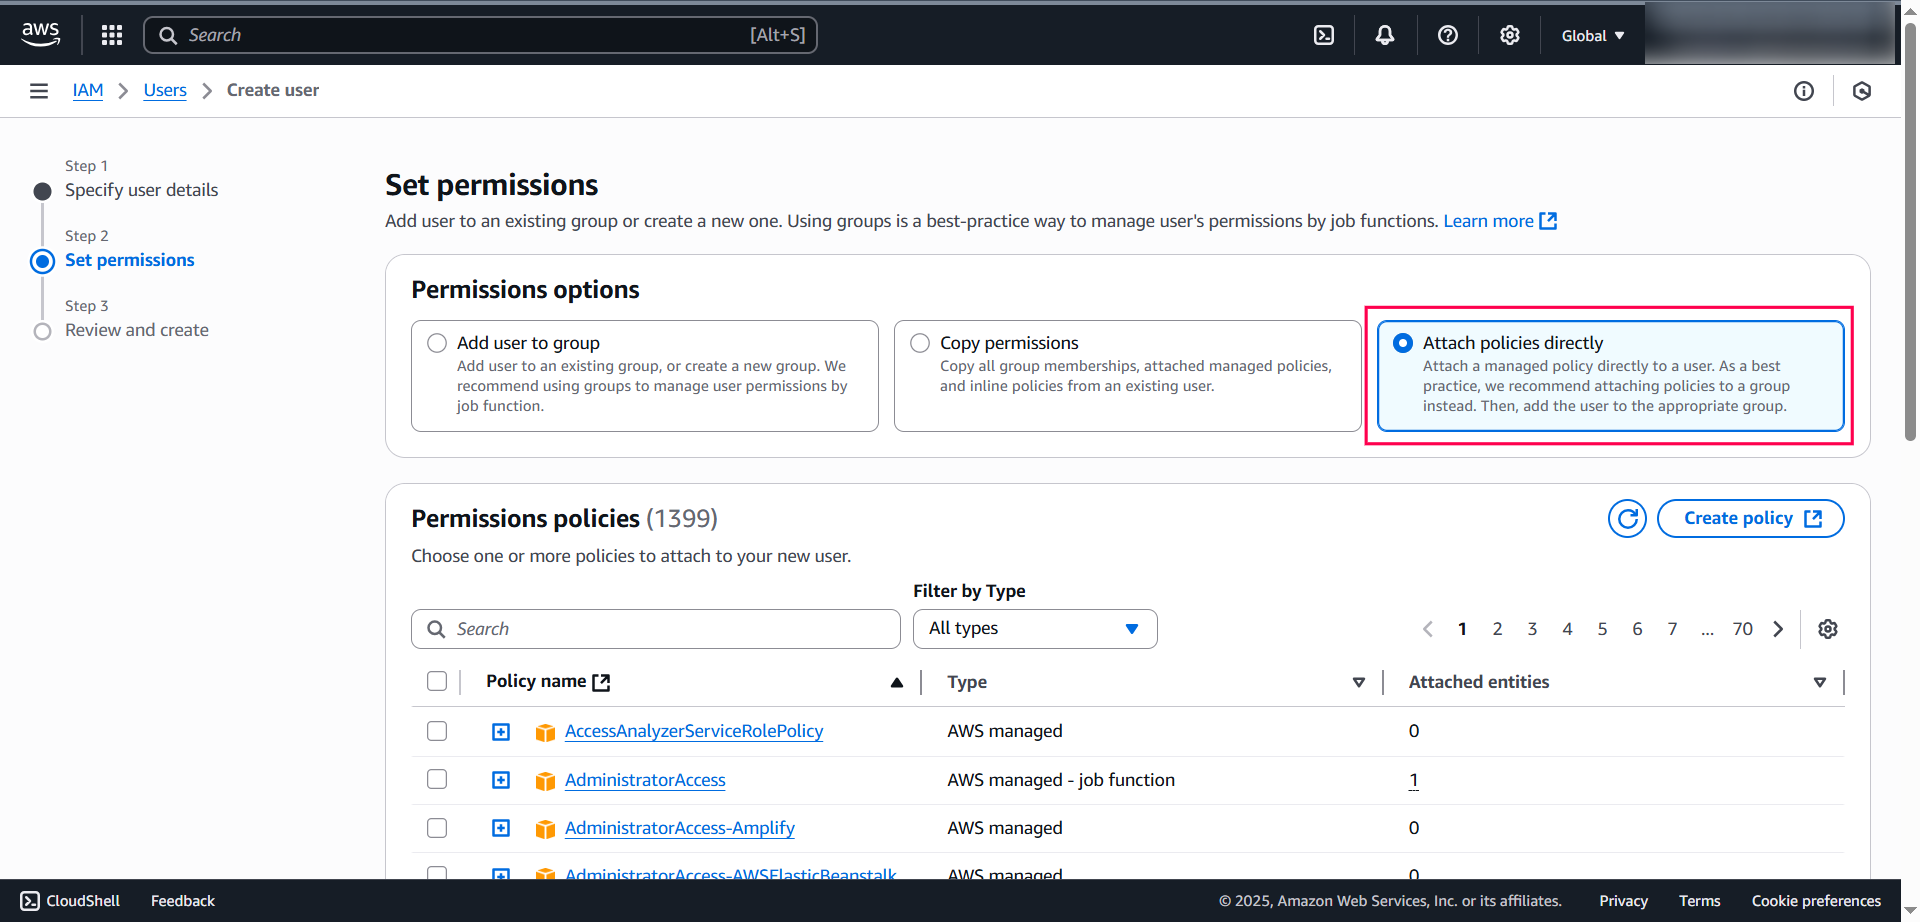
- Search for and select these two policies:
AmazonSESFullAccess
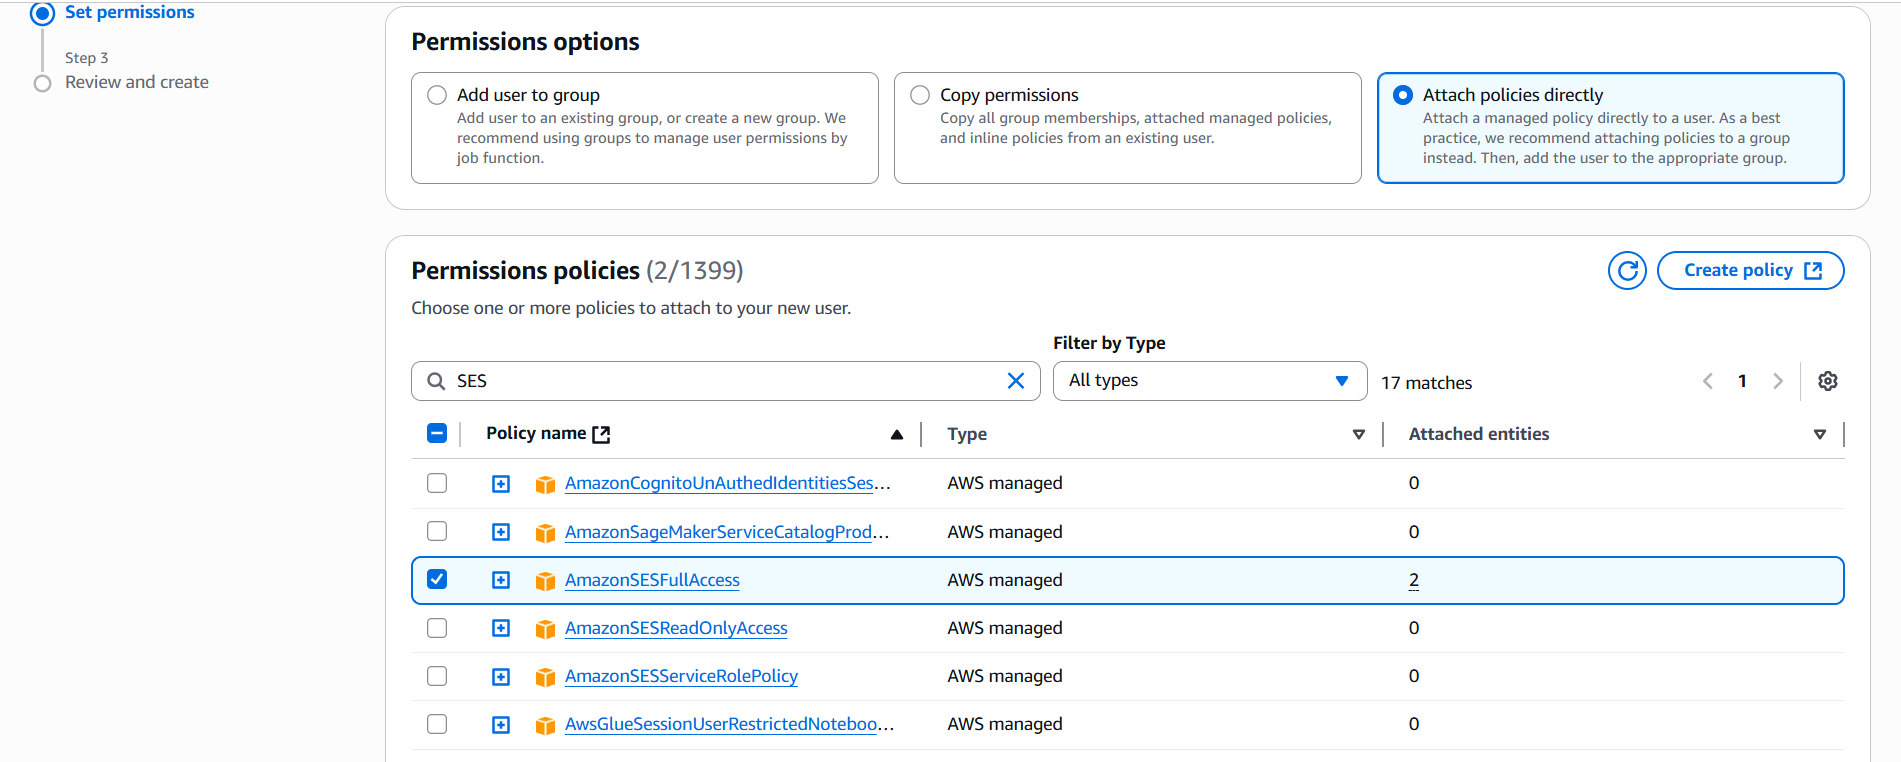
AmazonSNSFullAccess
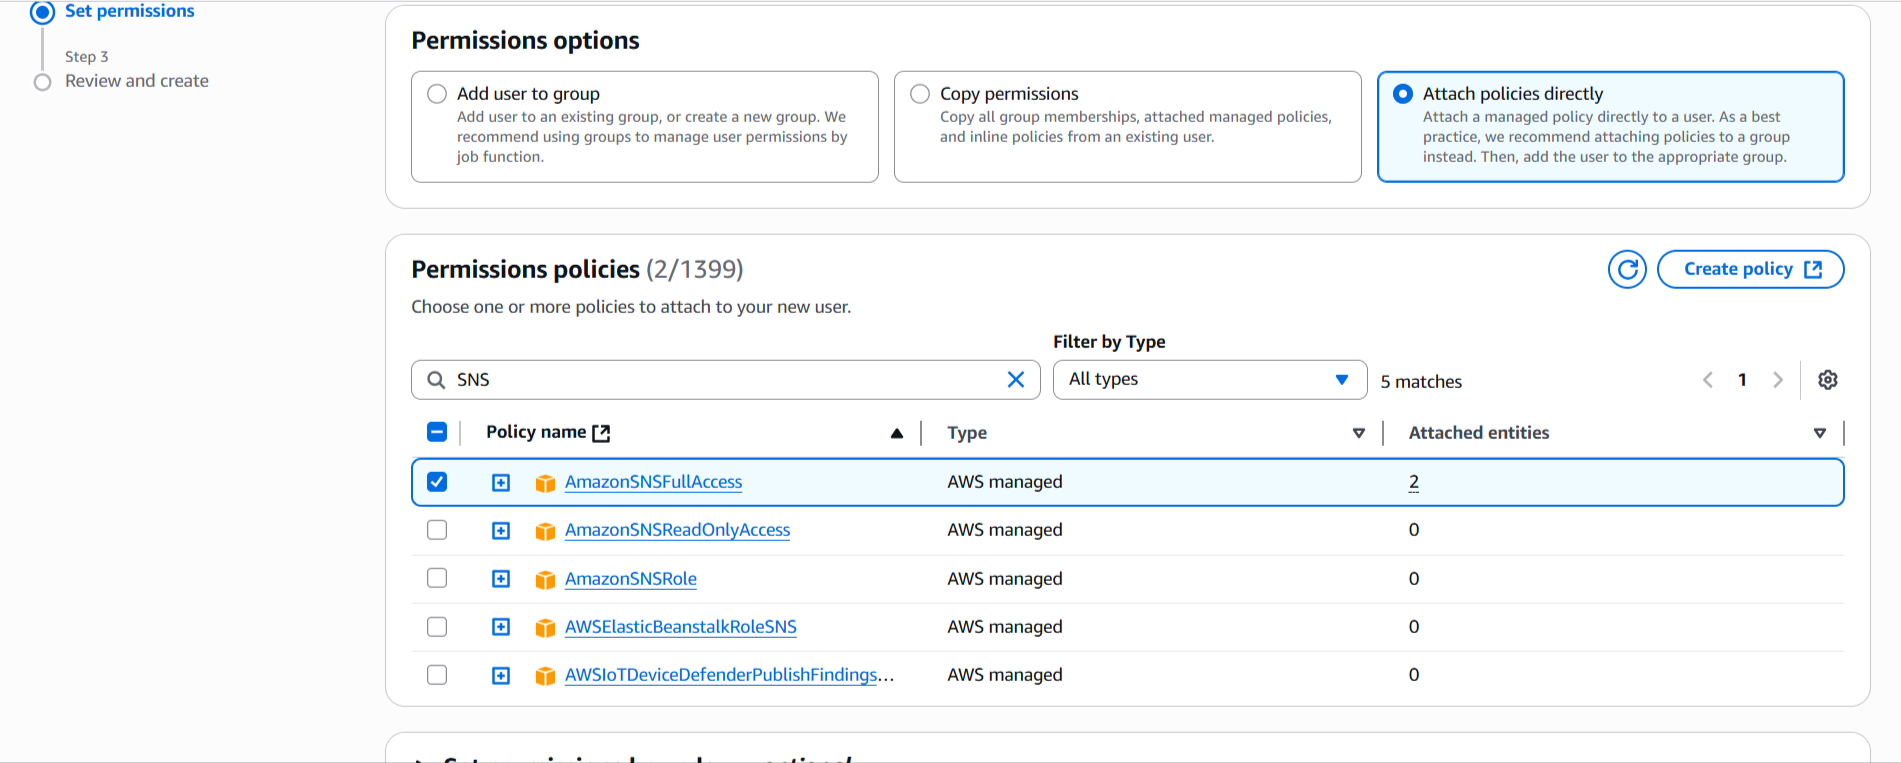
- Scroll down and click Next
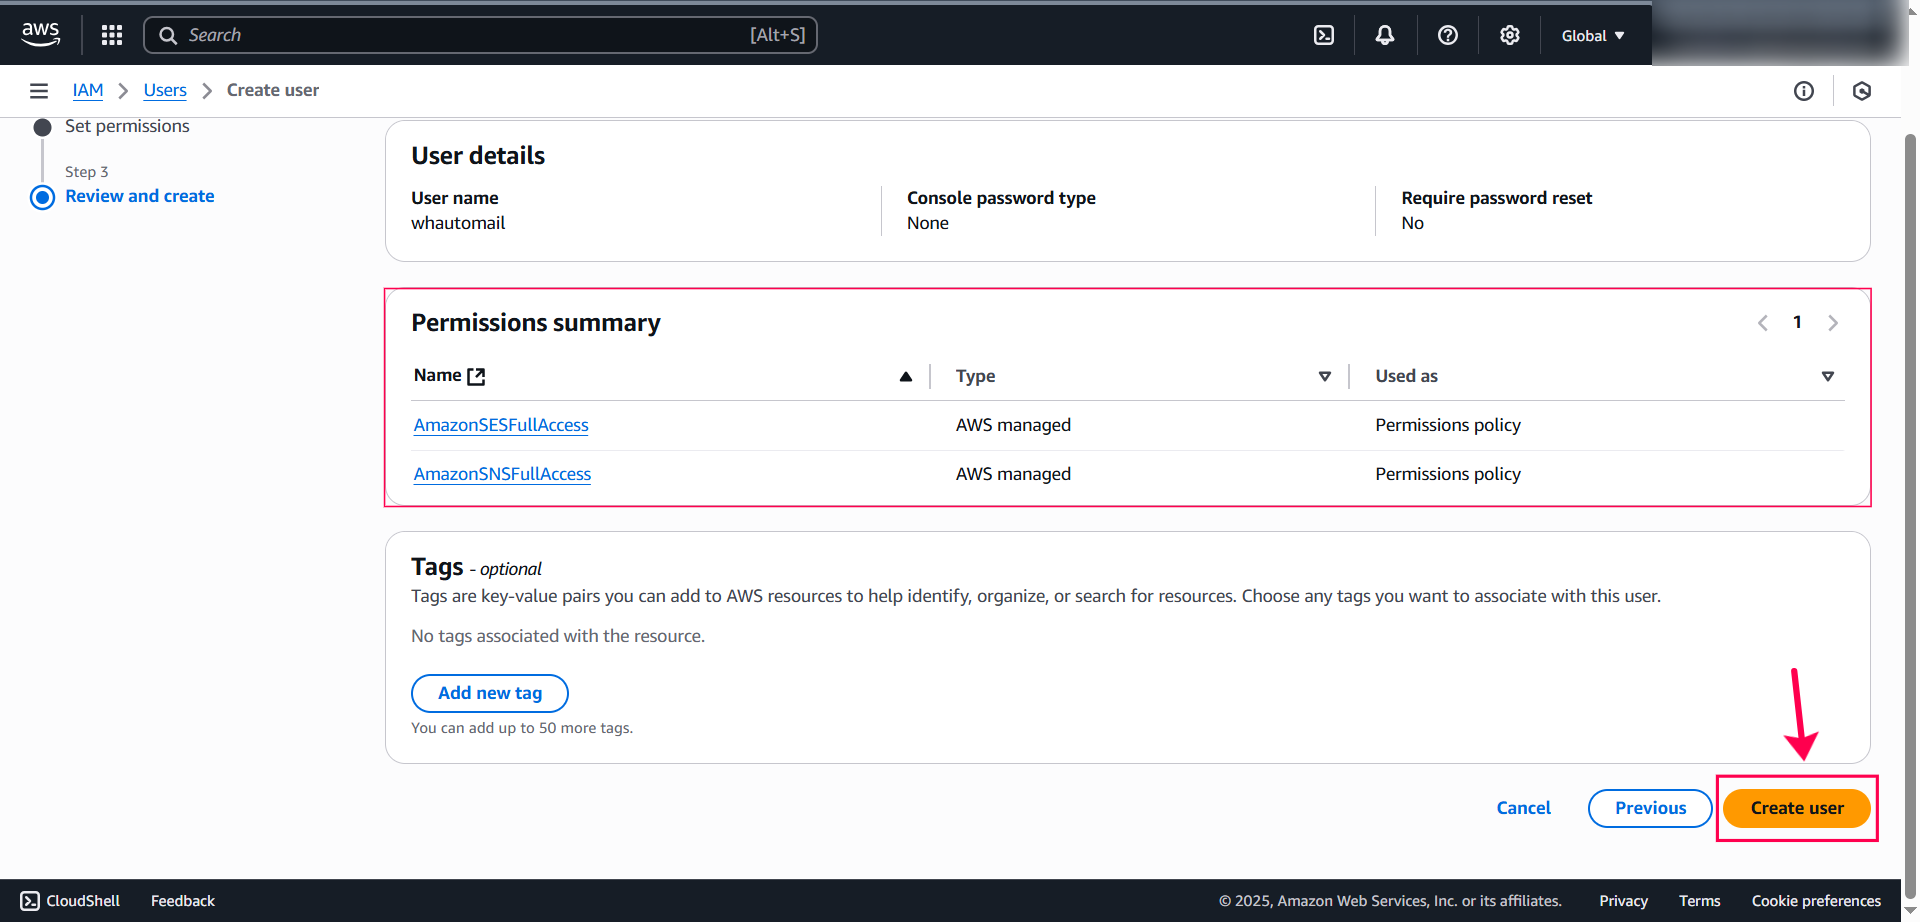
5. Review and Create
- Review the user details
- Click Create user
The AmazonSESFullAccess policy allows WhautoMail to send emails through SES, while AmazonSNSFullAccess enables bounce and complaint notifications.
🔐 Create Access Keys for the User
1. Open User Security Credentials
- Go back to the Users list
- Select the user you just created (e.g.,
whautomail) - Open the Security Credentials tab
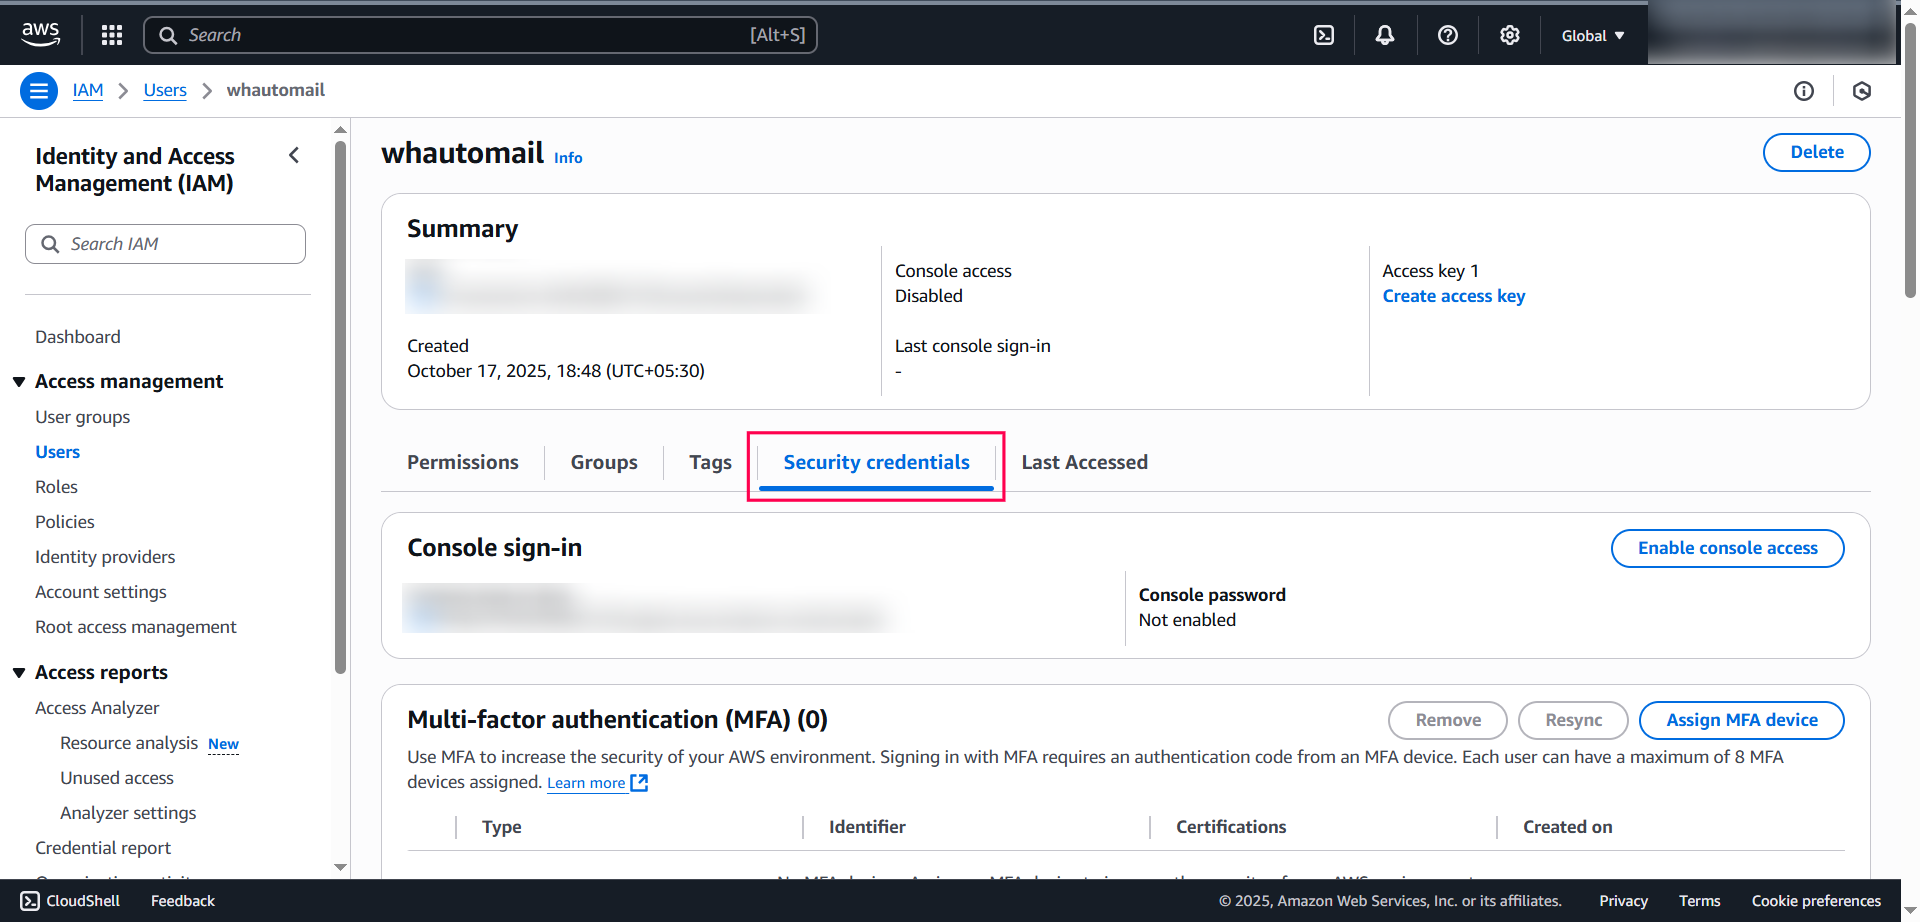
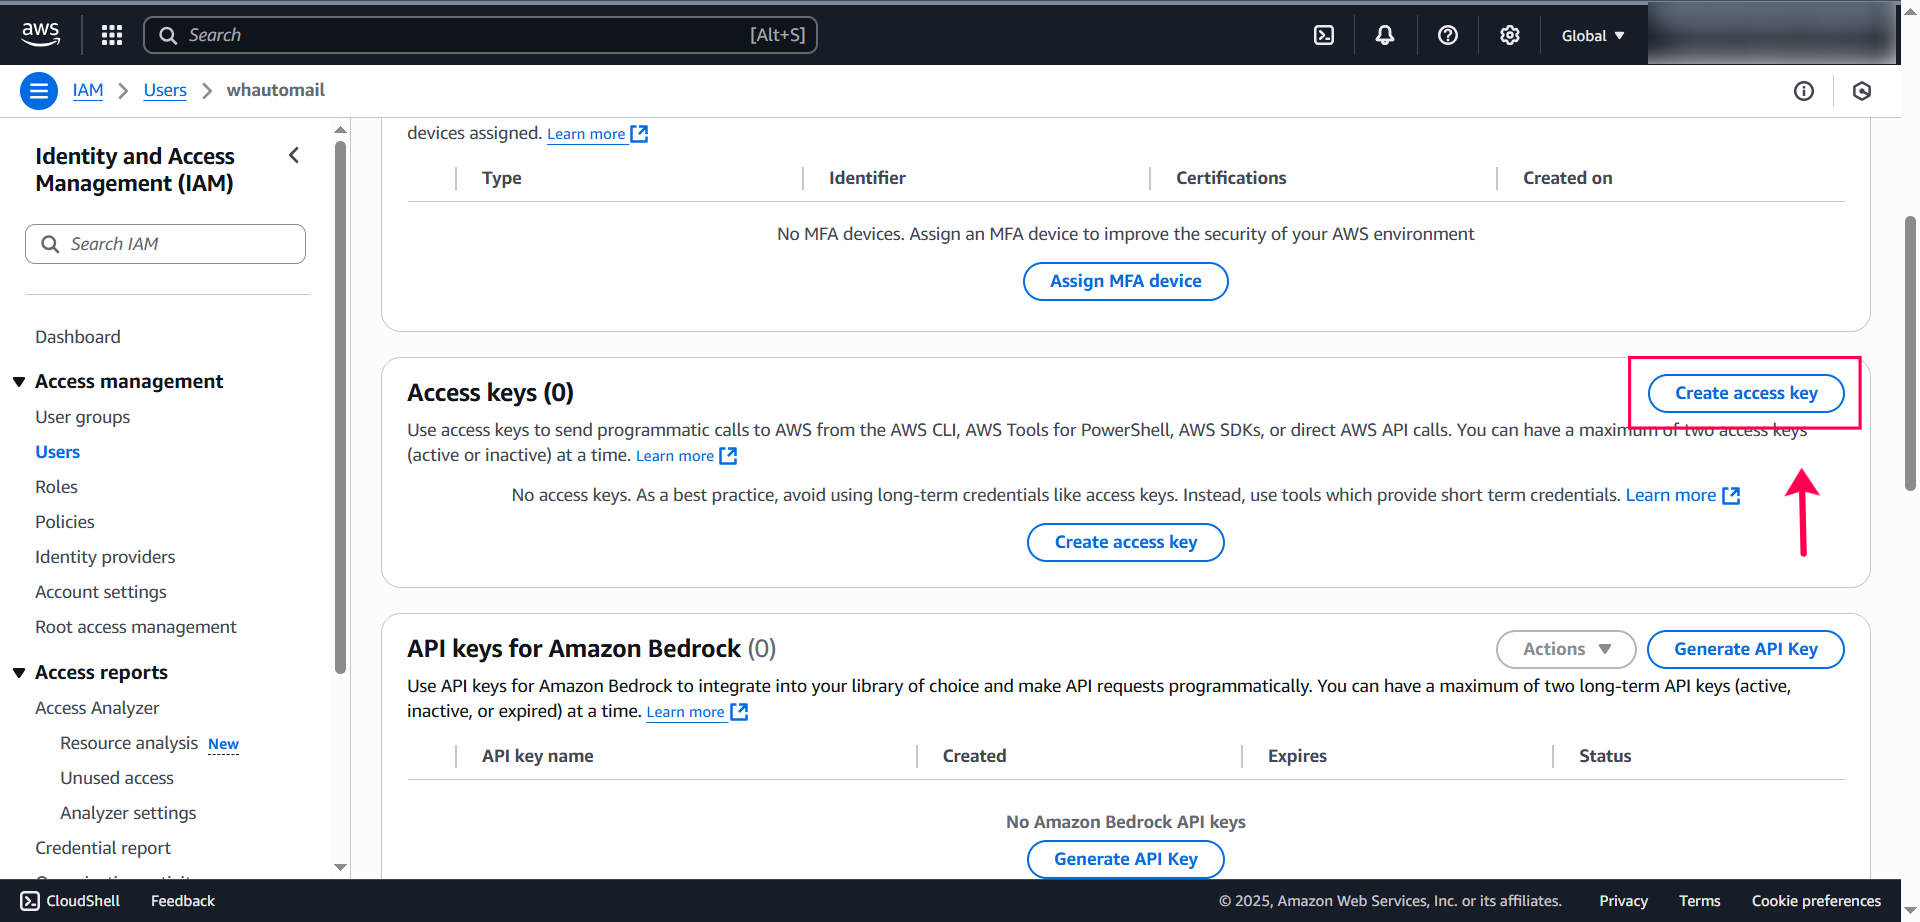
2. Generate Access Keys
- Scroll down to the Access keys section
- Click Create access key
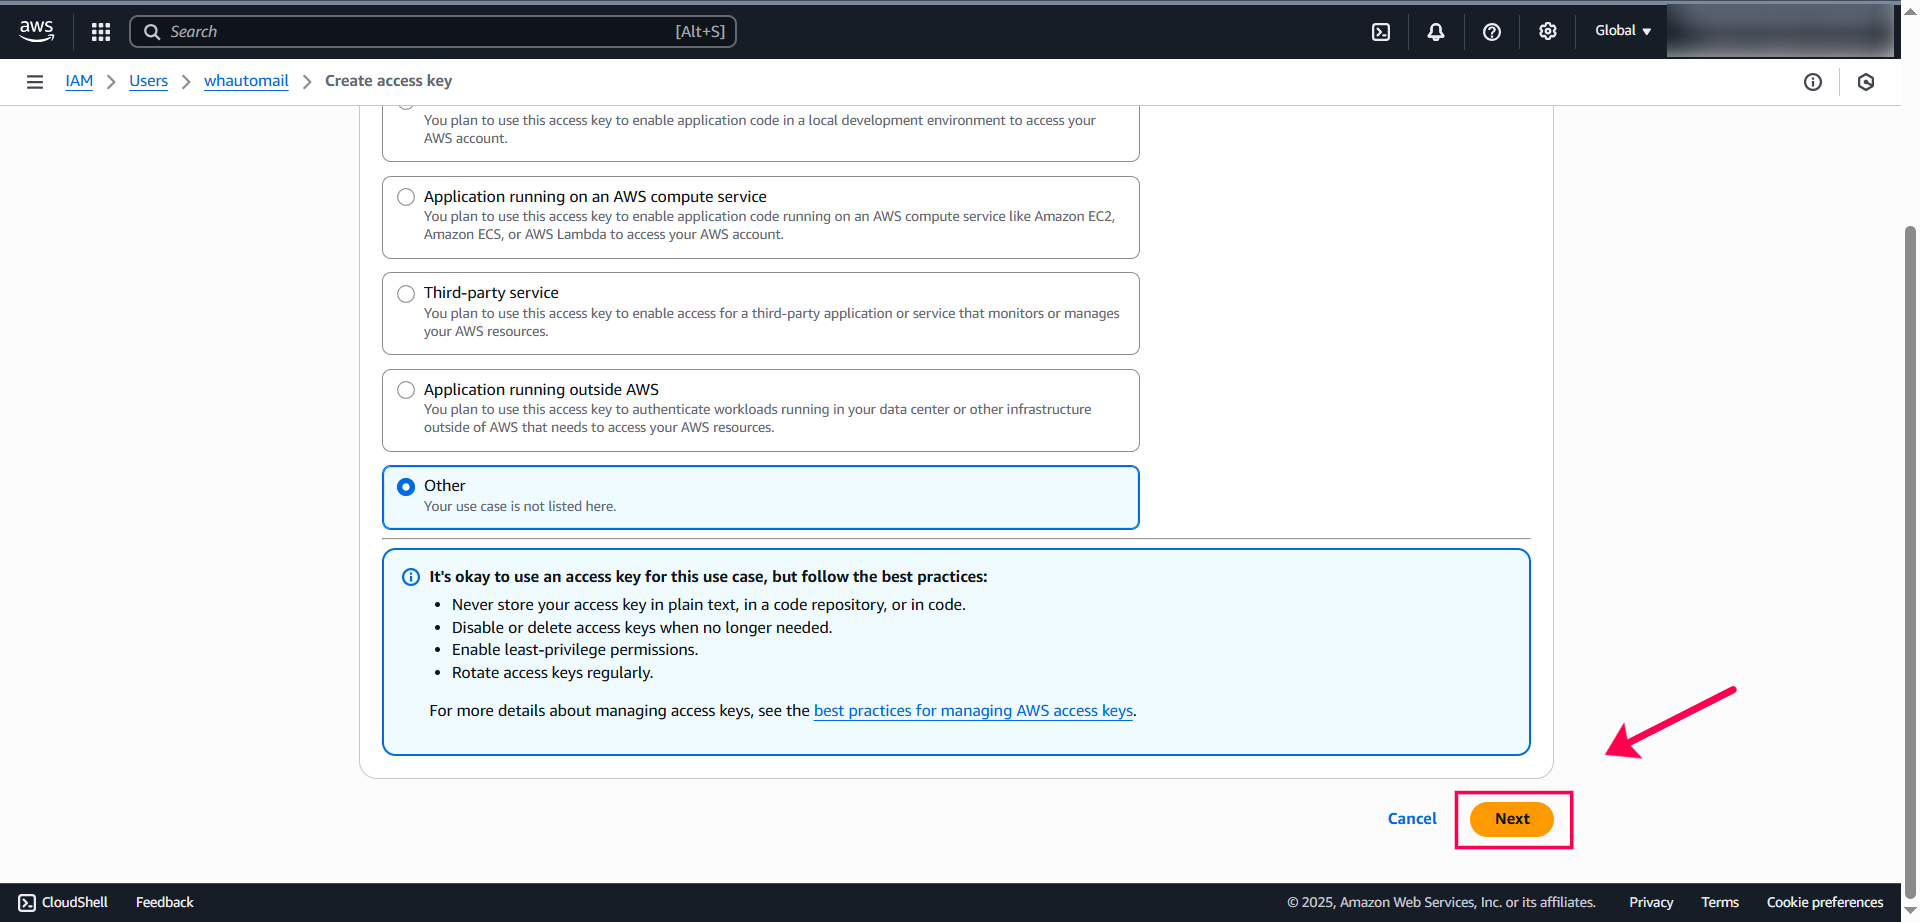
3. Choose Use Case
- Select Other as the use case
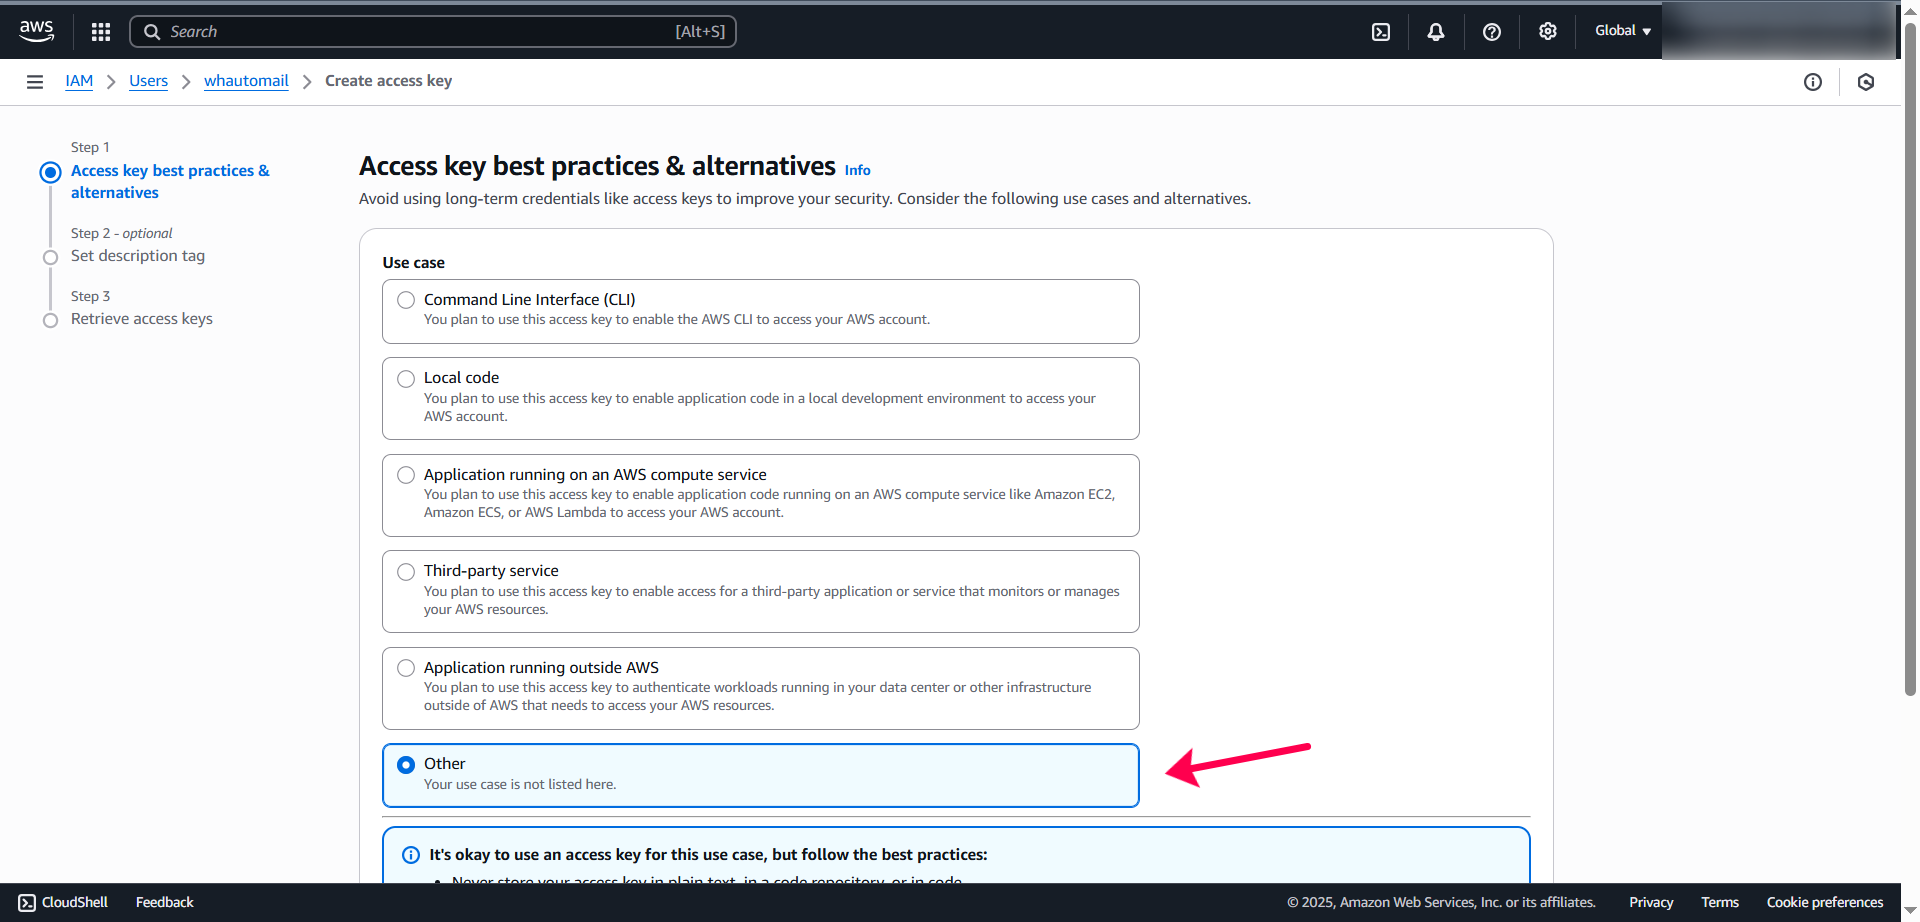
- Click Next
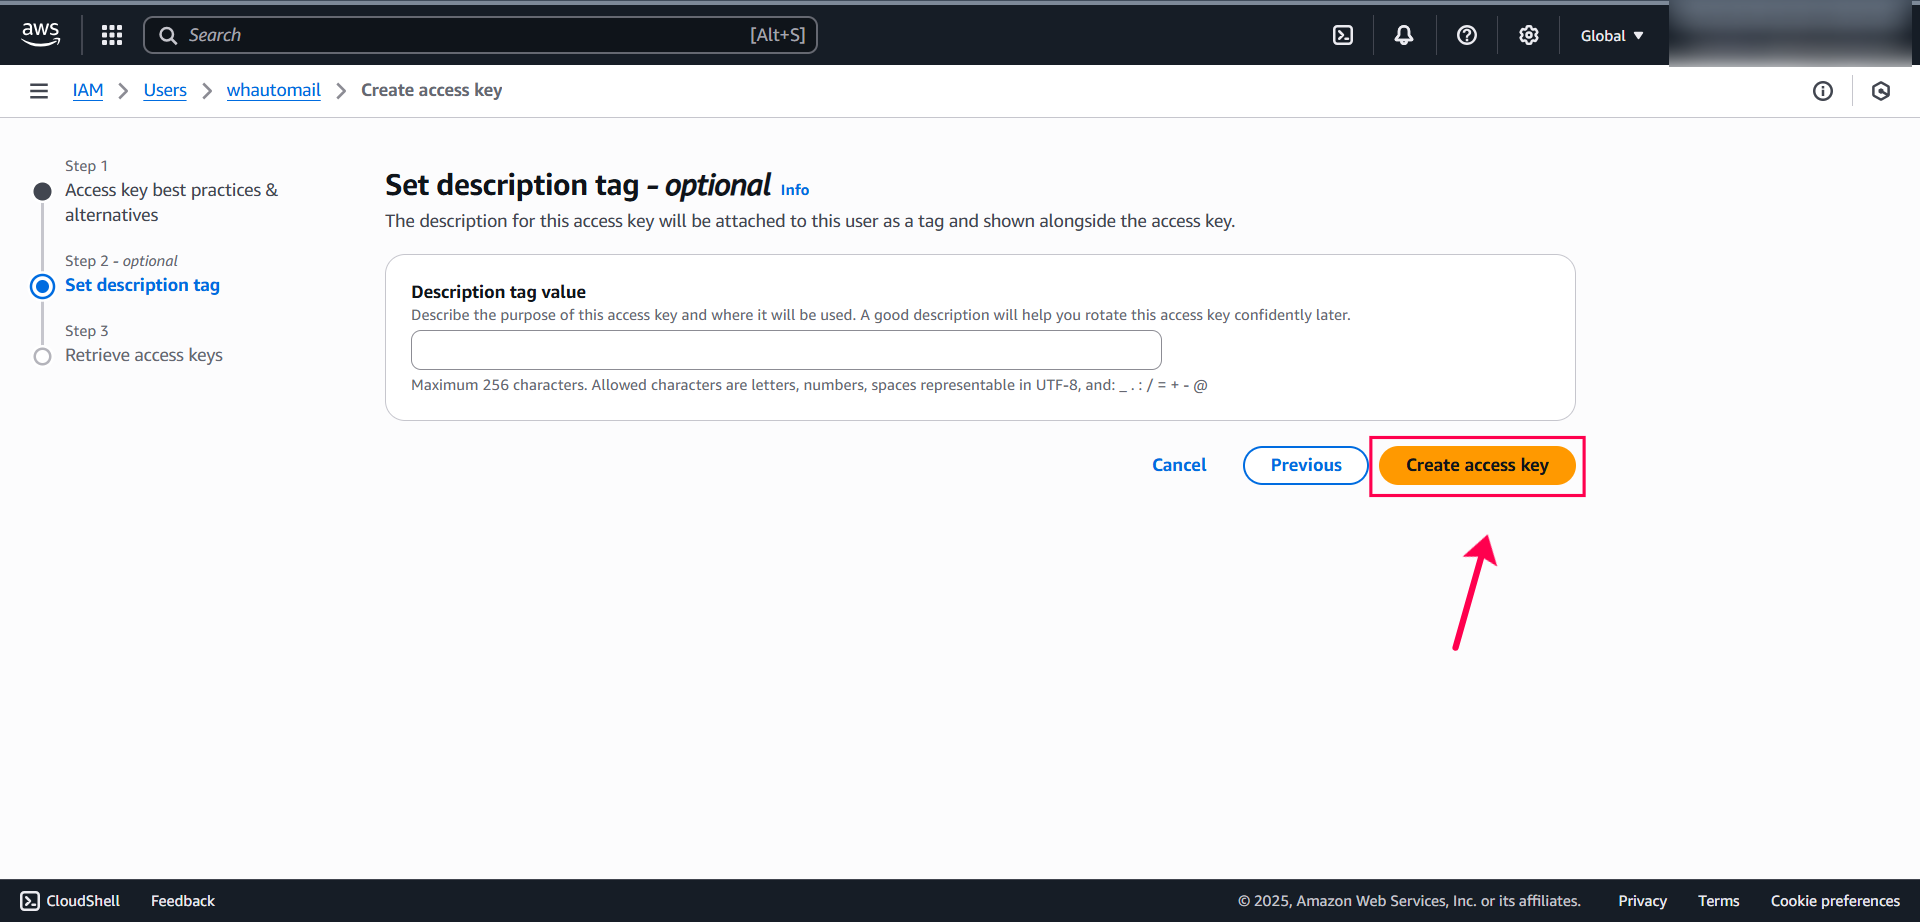
4. Add Description (Optional)
- Add a description tag like "WhautoMail Integration"
- Click Create access key
5. Save Your Credentials
You'll now see your Access Key and Secret Key.
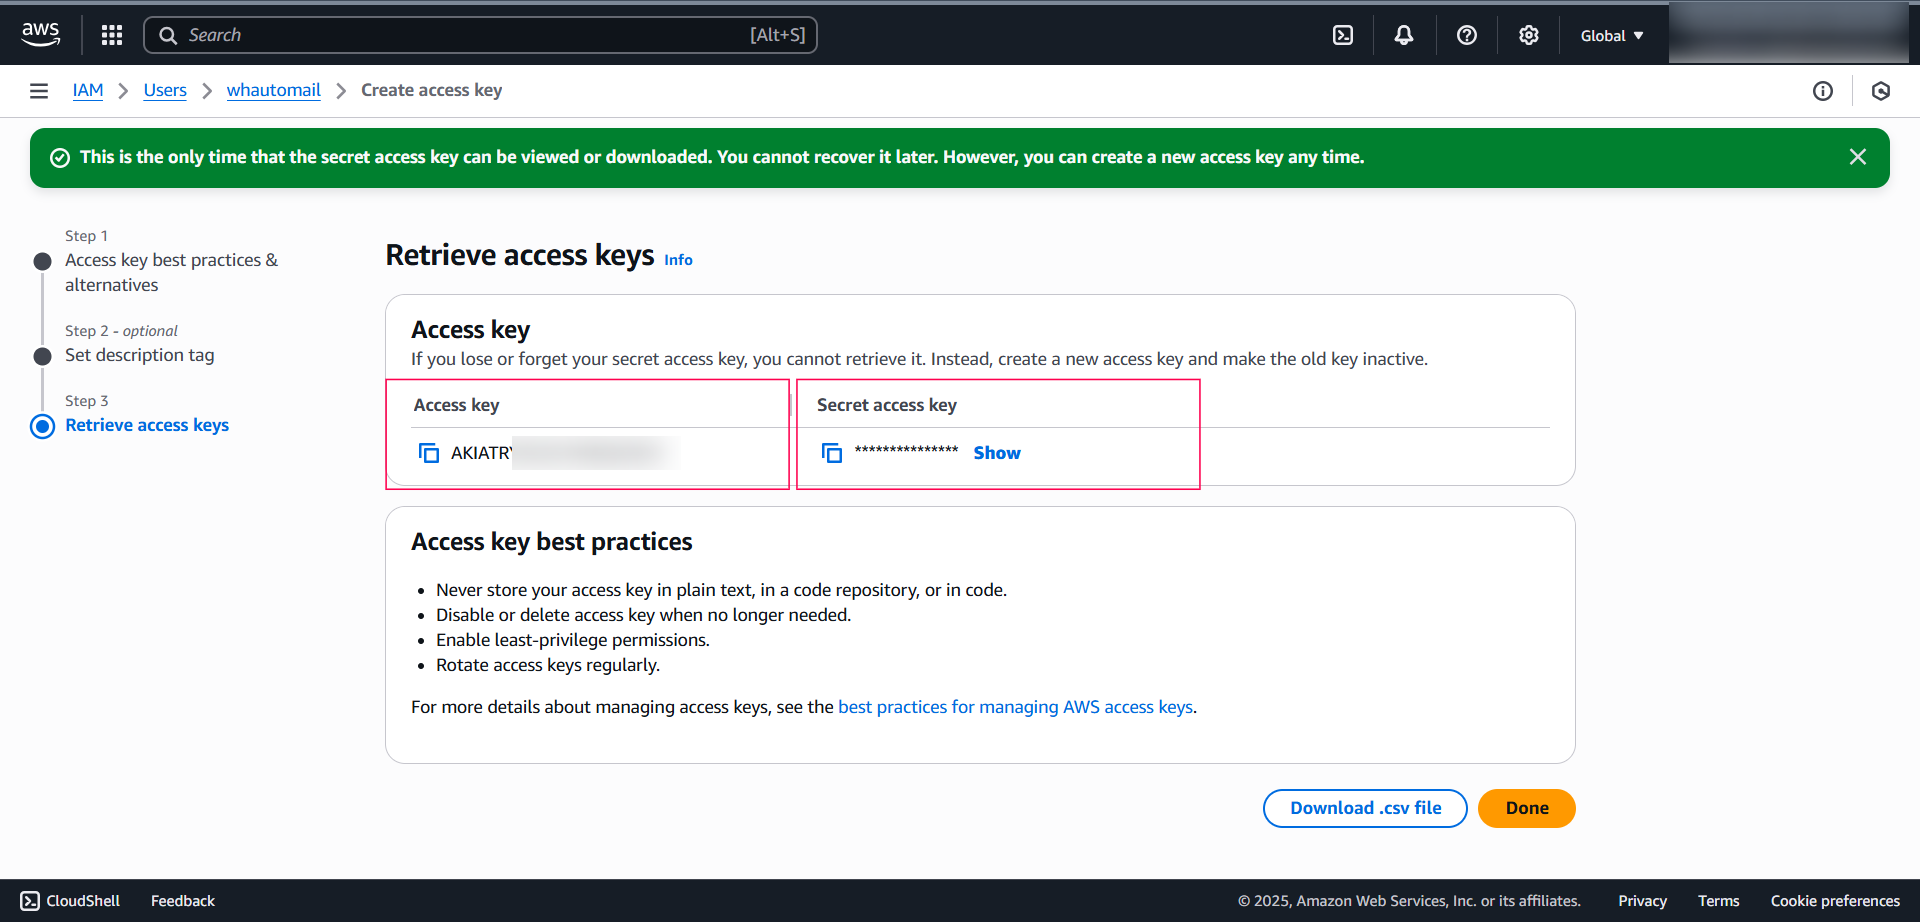
Save these credentials securely! You won't be able to retrieve the Secret Key again after closing this window.
🔗 Connect to WhautoMail
1. Copy Your Credentials
- Copy the Access Key from AWS
- Copy the Secret Key from AWS
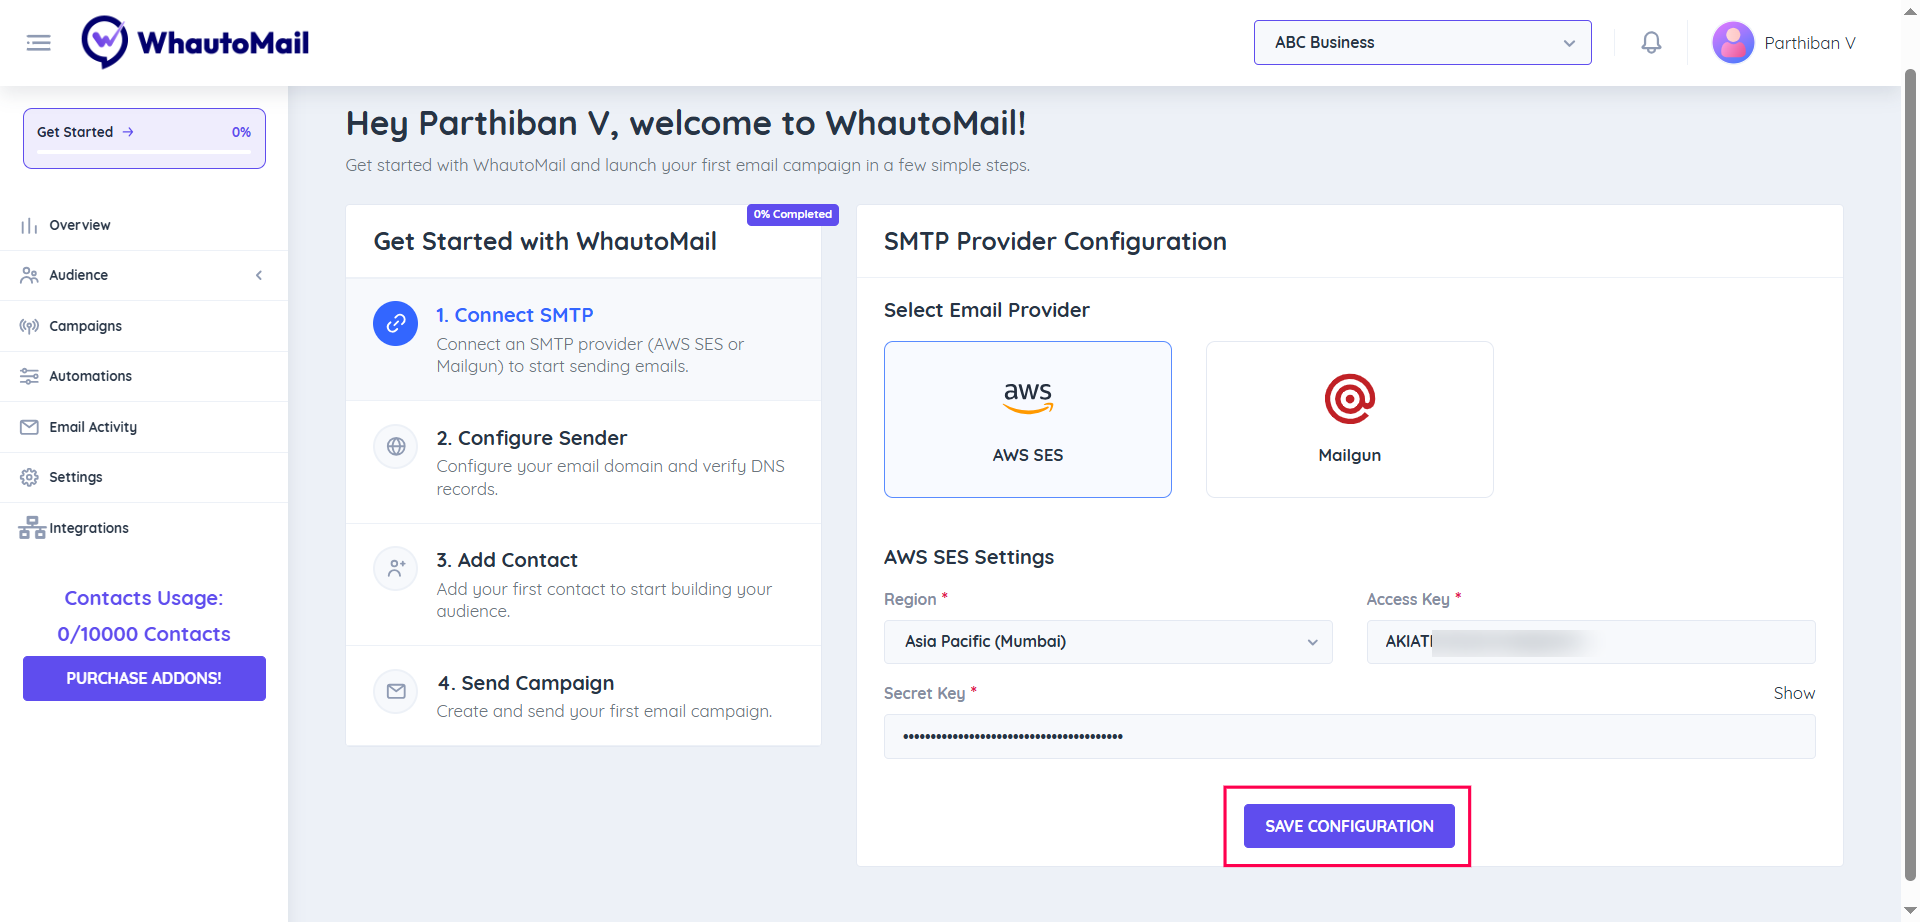
2. Configure in WhautoMail
- Go back to the WhautoMail app
- Paste the Access Key into the respective field
- Paste the Secret Key into the respective field
- Select your Region (e.g., Asia Pacific - Mumbai, US East - N. Virginia)
- Click Save Configuration
✅ Success! You've now successfully connected AWS SES with WhautoMail.
Step 4: Request Production Access
AWS SES starts in Sandbox Mode, which limits sending to verified email addresses only.
Move Out of Sandbox Mode:
- In the AWS SES console, click Account Dashboard
- Click Request production access
- Fill out the form with detailed information (see below for guidance)
- Submit the request
Production access approval typically takes 24-48 hours. Plan accordingly when setting up your account.
📝 How to Fill Out the Production Access Request
Providing detailed, accurate information significantly increases your approval chances. Here's how to complete each field:
1. Mail Type
Select Marketing (for promotional emails, newsletters, campaigns)
2. Website URL
Provide your main website URL where users can learn about your service.
Example:
https://www.yourcompany.com
3. Use Case Description
Provide a comprehensive description of how you'll use AWS SES. Include these key points:
Sample Use Case Description:
We operate [describe your business activity] at https://www.yourcompany.com and need
to send marketing emails, newsletters, and transactional notifications to our
subscribers.

We would like to use Amazon SES as our email sending infrastructure to deliver
these emails reliably and at scale to our subscriber base.

EMAIL COLLECTION PROCESS:
- Users sign up through our website at https://www.yourcompany.com/subscribe
- We implement double opt-in confirmation for all new subscribers
- Users must click a confirmation link in their email before being added to our list
- We maintain detailed records of subscription dates and IP addresses

SUBSCRIPTION SOURCES:
1. Website signup forms (https://www.yourcompany.com/subscribe)
2. Landing pages for specific campaigns
3. Account registration during product signup
4. Newsletter subscription widgets on blog posts

CONTENT TYPES:
- Weekly newsletters with company updates and industry insights
- Product announcements and feature updates
- Educational content and how-to guides
- Promotional offers (sent only to users who opted in for marketing)
- Account notifications and transactional emails

EXPECTED VOLUME:
- Current subscriber base: [Your number] subscribers
- Expected monthly volume: [Your estimate] emails
- Peak sending: [Your estimate] emails per day
4. Compliance and List Management
Explain your email compliance practices in detail:
Sample Compliance Description:
LIST MANAGEMENT & COMPLIANCE:

Subscription Process:
- All subscribers use double opt-in confirmation
- Confirmation emails are sent immediately upon signup
- Users must click verification link to activate subscription
- We store subscription timestamps and source URLs

Unsubscribe Management:
- Every email includes a prominent unsubscribe link in the footer
- Unsubscribe requests are processed immediately (within seconds)
- We use WhautoMail's suppression list feature to prevent re-sending
- Unsubscribed users are permanently removed from all campaigns
- We honor global suppression lists across all email types

Bounce & Complaint Handling:
- AWS SNS webhooks are configured for real-time bounce notifications
- Hard bounces are automatically removed from our list immediately
- Soft bounces are monitored and removed after 3 consecutive failures
- Complaint notifications trigger immediate list removal
- We maintain bounce rates below 2% and complaint rates below 0.1%

Data Protection:
- We comply with CAN-SPAM, GDPR, and CASL regulations
- Privacy policy available at: https://www.yourcompany.com/privacy
- Users can update preferences at: https://www.yourcompany.com/preferences
- We never purchase or rent email lists
- All contacts have explicitly opted in to receive our emails

Email Authentication:
- SPF, DKIM, and DMARC records are properly configured
- All emails are sent from verified domains
- Sender reputation is actively monitored

Monitoring & Quality:
- We track open rates, click rates, and engagement metrics
- Low-engagement subscribers are re-engaged or removed
- Content is relevant and valuable to our audience
- We maintain high deliverability standards
5. Additional Information to Include
Sample Email Content:
Subject: Welcome to [Your Company] - Please Confirm Your Subscription

Hi there,

Thank you for subscribing to [Your Company] newsletter!

Please confirm your subscription by clicking the link below:
[Confirmation Link]

Once confirmed, you'll receive:
- Weekly industry insights and tips
- Product updates and new features
- Exclusive offers and promotions

You can unsubscribe at any time by clicking the unsubscribe link
at the bottom of any email.

Best regards,
[Your Company] Team
Subscription Page URLs:
- Main signup:
https://www.yourcompany.com/subscribe - Privacy policy:
https://www.yourcompany.com/privacy - Terms of service:
https://www.yourcompany.com/terms - Preference center:
https://www.yourcompany.com/email-preferences
✅ Checklist Before Submitting
Make sure you have:
- Verified your sending domain in AWS SES
- Set up SPF, DKIM, and DMARC records
- Configured SNS topics for bounce and complaint notifications
- Implemented double opt-in in WhautoMail
- Created unsubscribe pages and preference centers
- Prepared sample email content
- Documented your subscription process
- Listed all subscription sources (URLs)
- Explained your bounce and complaint handling
- Described your list cleaning practices
- Be specific and detailed in your descriptions
- Provide actual URLs where users can subscribe
- Emphasize your double opt-in process
- Highlight your automated bounce/complaint handling via SNS
- Show you understand email best practices
- Mention your commitment to maintaining low bounce/complaint rates
- Include links to your privacy policy and terms
- Vague or generic use case descriptions
- No mention of how subscribers are obtained
- Missing unsubscribe or bounce handling procedures
- No double opt-in process described
- Purchased or rented email lists
- Lack of compliance with email regulations
Step 5: Verify Your Domain
After connecting AWS SES, you need to verify your domain to start sending emails.
See Adding & Verifying Domains for domain verification steps.
Troubleshooting
Connection Failed
- Verify SMTP credentials are correct
- Check that you're using the correct region endpoint
- Ensure your AWS account is active
Still in Sandbox Mode
- Verify production access request was approved
- Check AWS SES console for approval status
- Contact AWS support if delayed
Sending Limits
AWS SES has sending limits:
- Sandbox: 200 emails/day, 1 email/second
- Production: Starts at 50,000 emails/day, increases with usage
To increase limits:
- Go to SES console → Account Dashboard
- Click Request sending limit increase
- Submit your request
Best Practices
- Monitor Bounce Rates: Keep below 5%
- Handle Complaints: Set up complaint feedback
- Use Configuration Sets: Track email events
- Implement SNS Notifications: Get real-time feedback
Cost Estimation
AWS SES pricing (as of 2024):
Free Tier
- 3,000 message charges/month for the first 12 months
- Applies to outbound emails, inbound emails, and Virtual Deliverability Manager
- Sending 1 email = 1 message charge
- Receiving 1 email = 1 message charge
Pay-As-You-Go Pricing
- Outbound emails: $0.10 per 1,000 messages
- Outgoing data: $0.12 per GB
- Inbound emails: $0.10 per 1,000 messages
- Incoming data: $0.09 per 1,000 chunks (256KB per chunk)
Optional Add-Ons
- Dedicated IP (standard): $24.95 per IP per month
- Dedicated IP (managed): $0.00005 per email sent
- Virtual Deliverability Manager: Included (uses 2 message charges per email)
Cost Examples
Example 1: Small Volume (250,000 emails/month)
- Outbound messages: $24.70 (after free tier)
- Outgoing data: $0.96
- Total: ~$26/month
Example 2: Medium Volume (500,000 emails/month)
- Outbound messages: $49.70
- Outgoing data: $1.92
- Total: ~$52/month
Example 3: High Volume (2,000,000 emails/month)
- Outbound messages: $199.70
- Outgoing data: $7.67
- Total: ~$207/month
If you send from EC2 instances, data transfer costs may be reduced or eliminated depending on your configuration.
Additional Resources
Need Help?
Contact our support team at support@whautomail.com for assistance with AWS SES configuration.